The scene graph
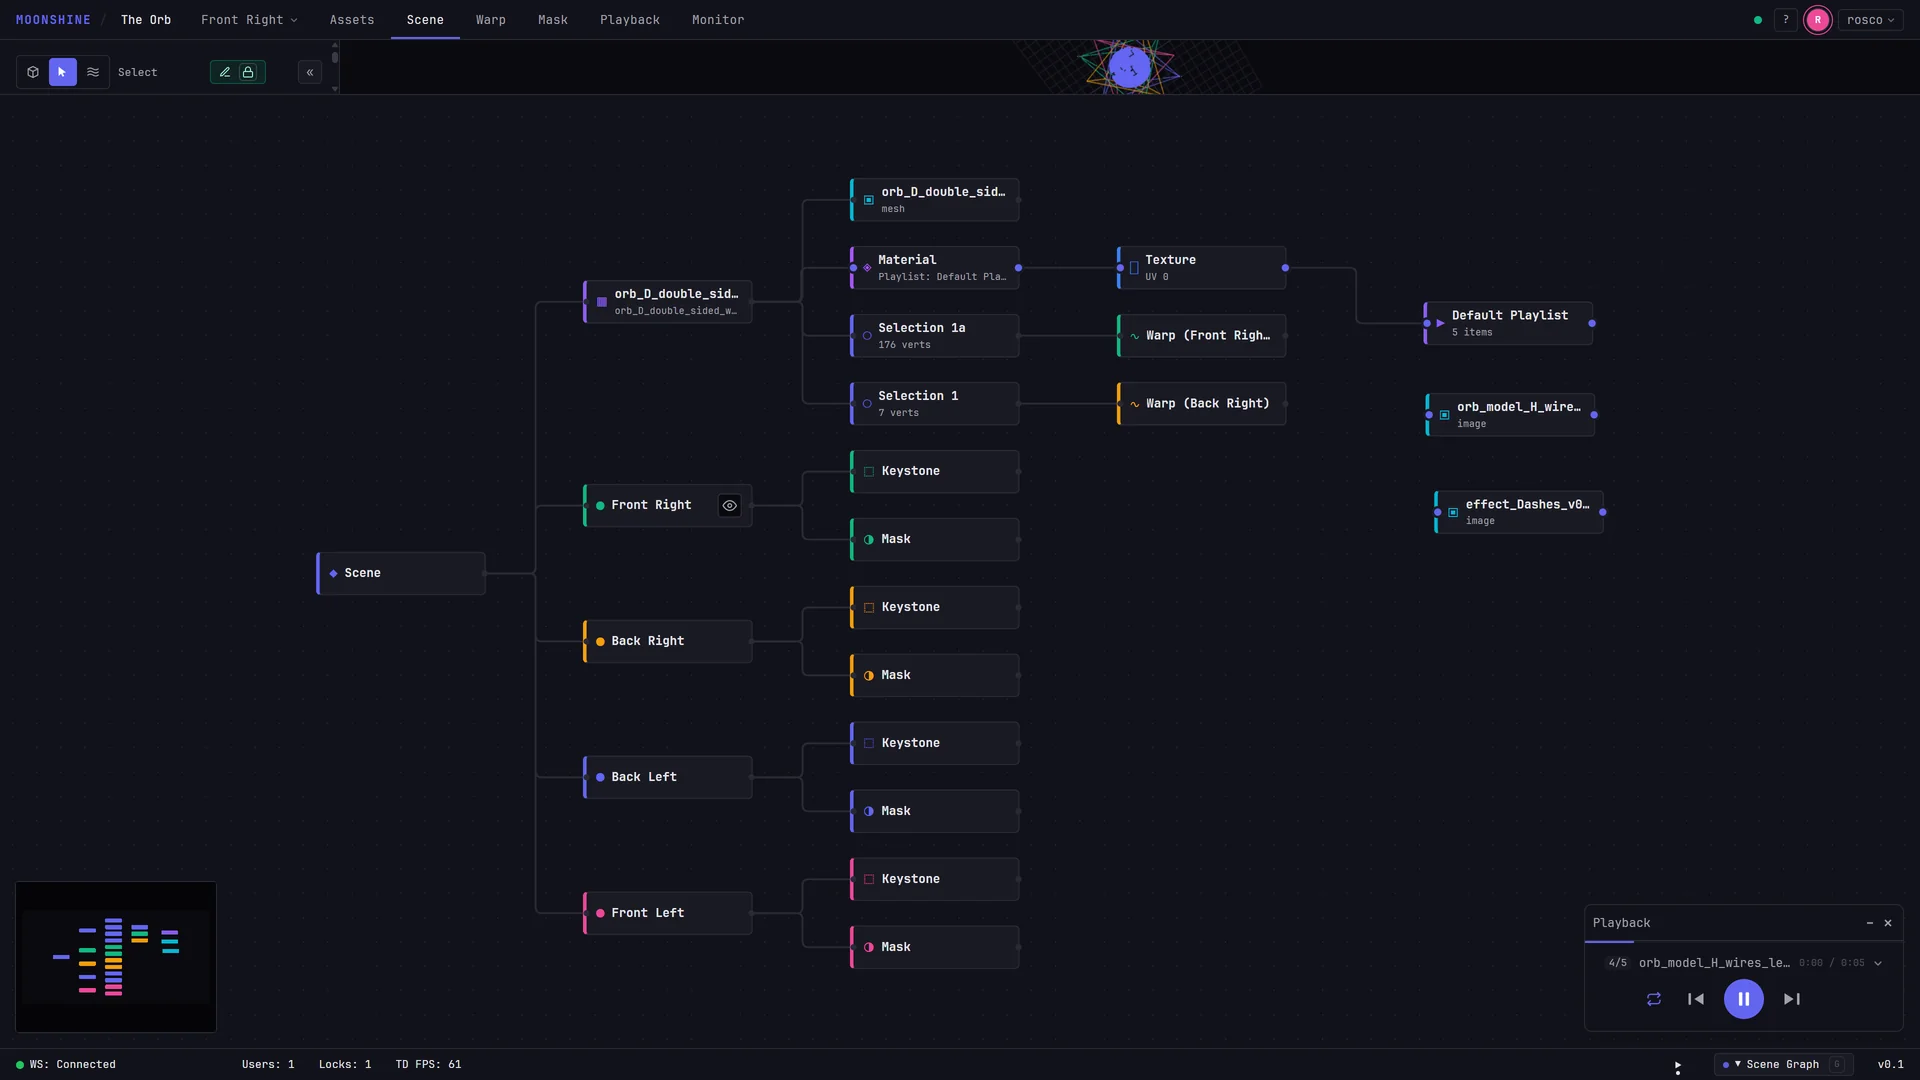
The scene graph shows your surfaces, projectors, alignments and media as a wired diagram you can edit directly.
It is the panel that slides up from the bottom of the window. It is available from every tab, not just Scene, so it stays open while you work anywhere else in the interface.
Open and size the panel
| Action | How |
|---|---|
| Open or close | Press G, or click Scene Graph at the right of the status bar |
| Resize | Drag the thin strip along the panel's top edge up or down |
| Fit everything into view | Hover the panel and press F |
The panel remembers whether it was open and how tall you left it. Height is limited to a sensible band — it will not shrink to nothing or take over the window.
Tip
Toggle Scene Graph is also in the command palette.
What the nodes represent
Nodes are laid out as a tree that grows left to right from a single root, which carries your scene's name.
| Node | Sits under | What it is | Its second line reads |
|---|---|---|---|
| Scene | — | The root. Holds scene-wide settings. | — |
| Surface | Scene | One model or primitive in the scene | No mesh, Plane, Box, or the name of the uploaded model |
| Media | A surface, or a Texture | The model a surface was built from, or the image or video wired into a Texture | The media type |
| Material | A surface | What that surface is currently showing | No source, an asset name, or Playlist: name — with · playing when that playlist currently owns the transport |
| Texture | A Material | Where the image is applied on the surface | UV 0 |
| Playlist | A Texture | The playlist feeding that surface, drawn in the tree when it has no loose node of its own | The number of items in it |
| Selection set | A surface | A named group of vertices belonging to one projector | The number of vertices in the set |
| Warp | A selection set | The alignment driven by that selection set | — |
| Projector | Scene | One projector | — |
| Keystone | A projector | That projector's 4-corner correction | — |
| Mask | A projector | That projector's mask | — |
Media and playlist nodes can also sit loose on the canvas rather than in the tree. Those are the ones you place yourself, and they are the only nodes you can drag around freely — everything else is positioned by the tree.
Note
Selection sets and their warps hang under the surface they reshape, not under the projector that owns them. The projector's name is on the Warp node, so you can tell at a glance which machine an alignment belongs to.
The wiring is meaningful
The lines are not decoration. The wire that runs into a surface's Texture node is what decides what plays on that surface. Change the wire and you change what the audience sees.
That is why a playlist wired into a surface behaves differently from a playlist you merely opened in the playback panel: the graph is the routing, and the transport follows it. See Putting media on a surface.
Select a node
Click a node to select it. Selection is shared with the rest of the interface, so clicking a node also takes you where that thing is edited:
| Node clicked | Where you land |
|---|---|
| Scene, Surface, Media, Projector | Scene tab, Object mode |
| Selection set | Scene tab, Select mode, with that set made active |
| Warp | Scene tab, Warp mode, with that set made active |
| Keystone | Warp tab |
| Mask | Mask tab |
| Material, Texture | Scene tab |
The reverse is true as well: selecting a projector from the top bar, or switching to the Warp or Mask tab, highlights the matching node in the graph.
Buttons on a node
| Button | Node | What it does |
|---|---|---|
| Eye | Surface | Hides or shows that model in the 3D view. A hidden model keeps all its alignment work. |
| Eye | Projector | Enters or exits that projector's point of view. It appears on the selected projector only. |
| Initials badge | Any | Someone is holding this node — green when it is you, their own color when it is another operator. See Locks. |
Right-click menus
Everything you can build in the graph is on a right-click menu. A ▸ marks a submenu, and a bullet marks the option currently in force.
On empty canvas
| Item | Result |
|---|---|
| Add Projector | Adds a projector with default optics, and selects it |
| Add Mesh ▸ Plane / Box / Empty | Adds a surface — a flat plane, a box, or an empty placeholder you can point at an uploaded model later |
| Add Playlist | Creates an empty playlist |
On the Scene node
Scene-wide settings. None of them touch the projected image — they change the 3D view you are working in, or record how the scene was built:
| Item | Options |
|---|---|
| Rename | Renames the scene |
| Add Projector | As above |
| Units ▸ | Meters, Feet, Centimeters — records the unit the scene was built in. It does not rescale anything already in the scene. |
| Background ▸ | Dark, Charcoal, Midnight, Black, Gray |
| Show Grid / Hide Grid | Toggles the floor grid |
| Grid Size ▸ | 10, 20, 40, 100 — how many units across the grid spans. The squares stay one unit each, so this is also how many squares you get. |
The same settings, plus a free-form grid size and a full color picker for the background, live in the Properties panel when the Scene node is selected.
Warning
Distances are read in meters for the photometric Lux view mode. Changing Units relabels your intent; it does not convert a scene that was modeled at the wrong size.
On a surface node
| Item | Result |
|---|---|
| Rename | Renames the surface |
| Change Source ▸ None / Plane / Box | Swaps the geometry underneath |
| Reset Transform | Returns position, rotation and scale to their defaults |
| Add Selection Set | Creates an empty selection set on this surface. With more than one projector, a submenu asks which projector it belongs to. The item is absent until the scene has at least one projector. |
| Remove Mesh | Deletes the surface |
On a projector node
| Item | Result |
|---|---|
| Add Selection Set | Creates a selection set for this projector on the active surface |
| Rename | Renames the projector |
| Projector Settings | Opens the full settings page for it |
| Frame Scene Model | Moves the 3D view so the scene model fills it |
| Delete | Removes the projector and all its settings, after a confirmation |
On alignment nodes
| Node | Item | Result |
|---|---|---|
| Keystone | Reset Keystone | Returns all four corners to their untouched positions |
| Warp | Reset Warp | Selects the owning projector and returns the surface to its unwarped shape. The reset still has to be baked — see Baking and reverting. |
| Selection set | Rename | Renames the set |
| Selection set | Clear Vertices | Empties the set without deleting it |
| Selection set | Delete | Removes the set, after a confirmation |
Mask nodes have no menu — masks are edited on the Mask tab.
On Material and Texture nodes
This is the texture routing menu — the fastest way to point a surface at something without dragging anything:
| Item | Result |
|---|---|
| Set Asset ▸ | Lists every image and video in the project. Choosing one shows it on the surface and drops a matching media node beside the Texture node, already wired. |
| Set Playlist ▸ | Lists every playlist. Choosing one wires it in and starts it playing on that surface. |
| Clear Texture | Unwires the surface, leaving it with no source |
Both submenus mark the current source with a bullet, so you can see what is routed before you change it. Each entry only appears when there is something for it to do: no images or videos in the project and there is no Set Asset; no playlists and there is no Set Playlist; nothing routed yet and there is no Clear Texture.
On media and playlist nodes
| Node | Item | Result |
|---|---|---|
| Media in the tree | Open in Asset Library | Jumps to the Assets tab |
| Loose playlist node | Open in Playback Panel | Jumps to the Playback tab with that playlist loaded |
| Loose media or playlist node | Remove from Graph | Removes the loose node from the canvas. The media itself is untouched. |
Route media by wiring
Dragging is the other way to do the same job, and it is usually faster when you are auditioning options.
Drop media straight onto a surface's source:
- Drag an image, a video or a playlist from the assets or playback list.
- Drop it directly on the surface's Material or Texture node — the node highlights as you hover it.
- The surface takes it immediately, and a loose node for the source appears beside it, wired in.
Park sources on the canvas, then wire them:
- Drag media or a playlist onto empty canvas. The panel highlights and shows Drop asset to add to graph, and a loose node lands where you dropped it.
- Drag from the round handle on that node to the round handle on a surface's Texture node.
- Release. The surface switches to that source — a video or image starts previewing, a playlist starts playing.
Loose nodes stay put after they are wired, and where you put them is remembered. That is the point: park three candidate clips beside a surface and swap between them by re-wiring, instead of hunting through a media list each time.
Other drop behavior worth knowing:
- Dropping a 3D model on empty canvas creates a new surface from it rather than a loose node. Material and Texture nodes take images, videos and playlists only — a model dropped on one is ignored.
- Only media and playlist nodes can be wired to a Texture or Material node. Any other connection is refused as you drag it.
- Select a loose node and press Delete or Backspace to remove it from the canvas.
Rename a node
Right-click the node, choose Rename, type, and press Enter — or click away, which commits as well. Esc cancels. Scenes, surfaces, projectors and selection sets can all be renamed this way, and the new name appears everywhere else in the interface immediately. A node another operator is holding cannot be renamed until they release it.
Move around the graph
- Pan — drag empty canvas.
- Zoom — scroll, or pinch on a trackpad.
- Fit — hover the panel and press F. The view also fits itself whenever the number of nodes changes, so a newly added projector never lands off-screen.
- Minimap — bottom-left. Drag or zoom it to jump around a large graph.
Working with other operators
Nodes carry the same locks as the panels they represent. A node held by someone else shows their initials in a badge, and its fields are read-only for you until they move on. You can still click it to look. See Locks and Following an operator.