Scene basics
The Scene tab is the 3D model of your venue — it holds the surfaces you project onto and the projectors aimed at them, and this page covers moving around in it and setting it up.
Everything you build here is spatial. A projector sits at a real position, aimed in a real direction, with a real throw ratio. A surface sits where the physical object sits. When the model matches the room, the projected result matches too — and alignment becomes a set of small corrections instead of guesswork.
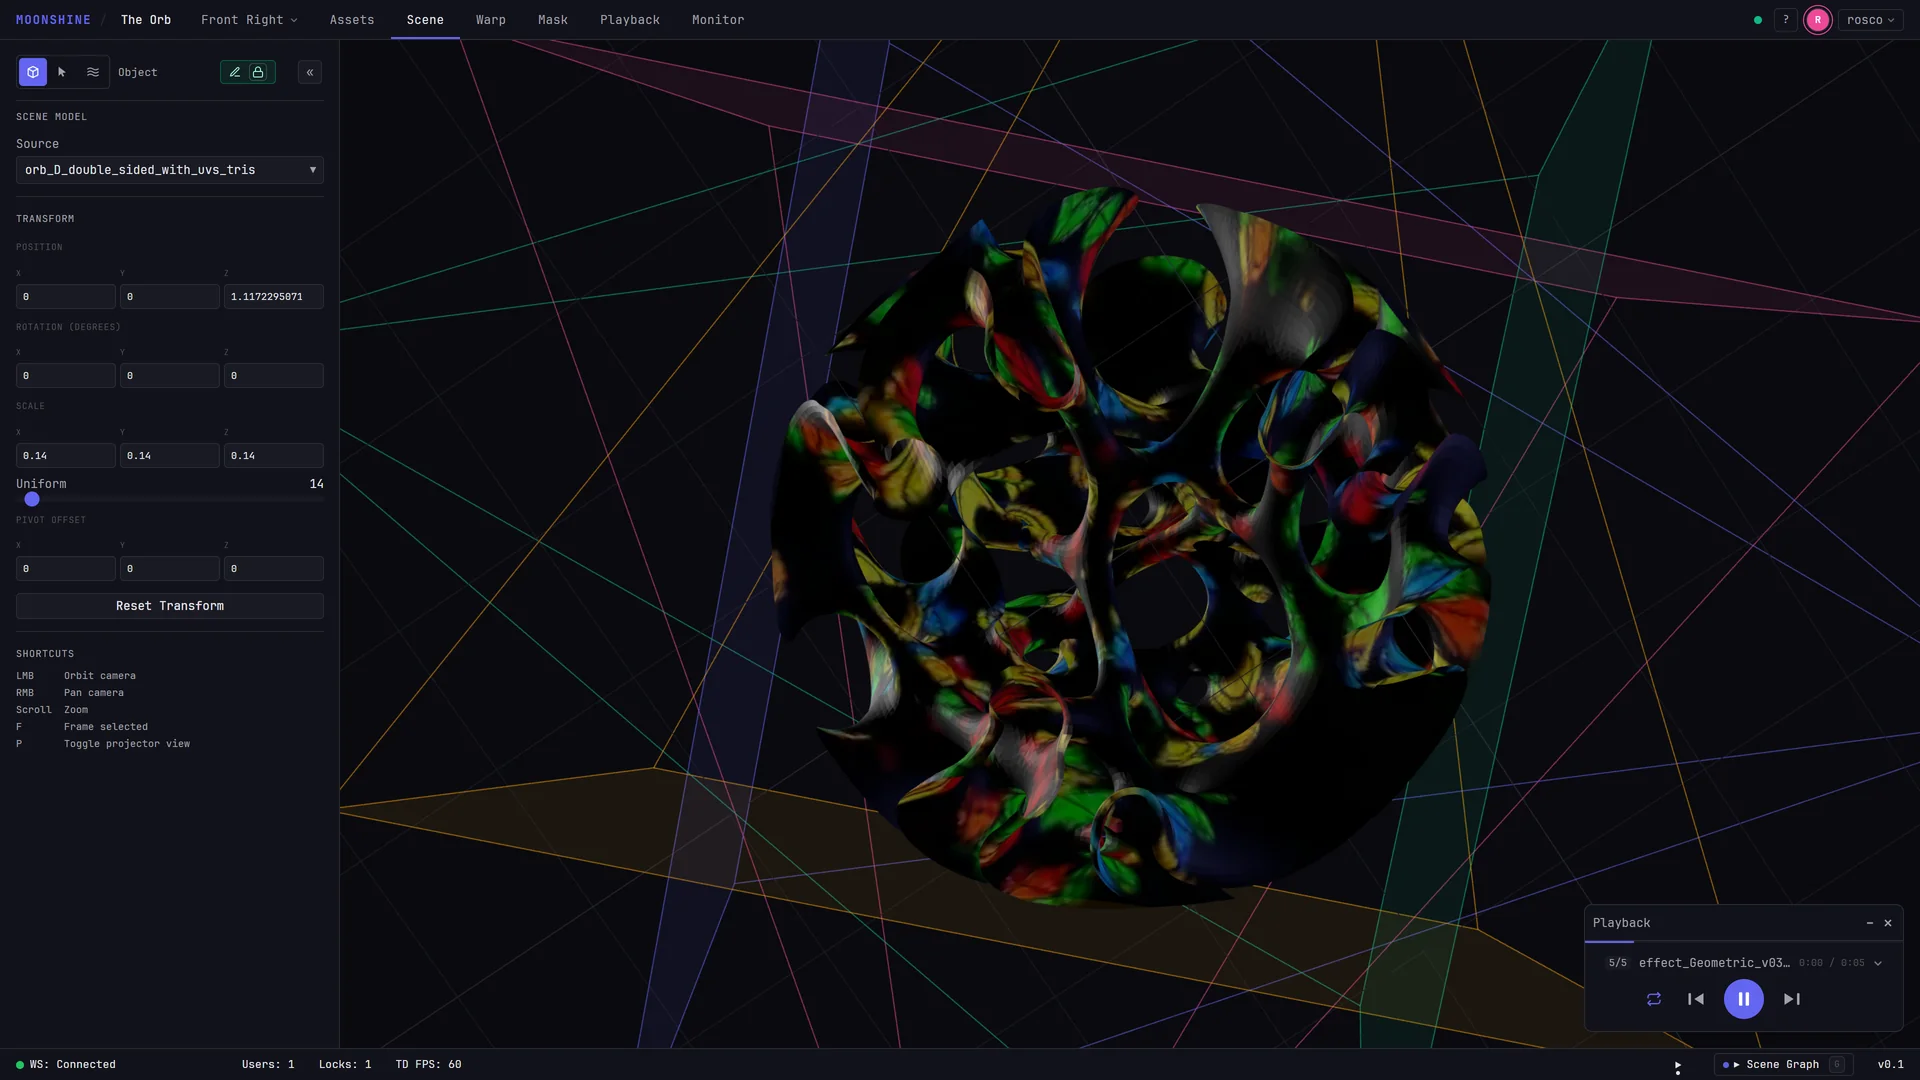
What is on screen
| Area | What it holds |
|---|---|
| Viewport (center) | The 3D view: surfaces, projector bodies, and their throw cones |
| Mode toolbar (top-left, floating) | Object / Select / Warp mode, and the UV / Projection / Lux / Solid display buttons |
| Properties panel (left) | Settings for whatever is selected — a surface, a projector, or the scene itself |
| Scene graph (bottom) | The tree of scene contents. Press G to show or hide it |
Press \ to collapse the Properties panel when you want the full width for the viewport.
Moving the camera
The viewport camera orbits around a pivot point. All of these work anywhere over the viewport.
| Input | Action |
|---|---|
| Left-drag | Orbit — around the point you pressed on |
| Middle-drag | Zoom — down or right pulls back, up or left moves in (either axis works) |
| Right-drag | Pan — moves the pivot sideways and up/down |
| Scroll wheel | Zoom in and out |
| F | Frame the selection |
A few details worth knowing:
- Orbit turns around whatever you grabbed. Press on an object and the view rotates around that exact point, marked by a crosshair for as long as you hold the button. Press on empty space and it falls back to the current pivot. Pressing alone never moves the camera — only dragging does.
- The cursor disappears while you navigate so nothing competes with the motion, and during a pan or zoom the drag has no edges: run out of screen and the pointer wraps, so the gesture keeps going as far as you want to take it.
- Orbit does not tip past vertical. You can look almost straight down and almost straight up, but the camera stops just short of the poles so the view never flips over.
- Zoom is bounded. The camera will not push closer than 1 unit to the pivot, or pull back further than 200 — this applies to the wheel and the middle-drag alike.
- Right-drag pans; a right-click without dragging opens the scene menu (see below). Moving more than a few pixels while the button is down is treated as a pan, and the menu stays closed.
- Your viewpoint is remembered. Where you left the camera is restored the next time you open the Scene tab, including after reloading.
Framing with F
F points the camera at something and pulls the distance in to fit it. What it frames depends on what is selected:
| Selection | F frames |
|---|---|
| A projector | That projector, including its full throw cone |
| A surface | That surface |
| Nothing | The active surface |
F only fires while the pointer is over the viewport, and it is disabled while you are looking through a projector.
Tip
Lost in space? Right-click empty viewport space and choose Home. It frames the active surface, which is almost always the way back.
The scene menu
Right-click anywhere in the viewport for two actions that are always available:
| Item | What it does |
|---|---|
| Home | Frames the active surface |
| Refresh stream | Restarts the video feed being drawn on your surfaces, if it has gone quiet |
Right-clicking directly on a projector body adds three more items above these — see Projectors.
Modes
The three buttons at the left of the floating toolbar change what clicking in the viewport does. They do not change the camera controls, which work the same in every mode.
| Mode | Key | What a click does |
|---|---|---|
| Object | V | Selects a surface or a projector and attaches a transform gizmo to it |
| Select | E | Paints a vertex selection onto the surface, ready for warping |
| Warp | W | Drags selected vertices to deform the surface |
Object mode is the one you build in — see Surfaces and models and Projectors. Select and Warp are the sculpting pair, covered in 3D surface warping.
Display modes
The four buttons on the right of the toolbar change how surfaces are shaded. They are a view setting only — nothing about your scene changes when you switch.
| Button | Shows |
|---|---|
| UV | Your media mapped onto the surface by its own texture coordinates |
| Projection | What the projectors actually land on the surface, including overlap and shadowing |
| Lux | A false-color heatmap of illuminance on the surface |
| Solid | A flat shaded fill. A color swatch appears beside the buttons while Solid is active |
View modes covers what each one is for and when to trust it.
Scene properties
With nothing selected, the Properties panel shows the settings that belong to the scene as a whole, under the heading Scene. Click empty space in the viewport to deselect and get back to it.
Name
A free-text label for the scene. It is shared with everyone in the project.
Units
Records what one world unit means: Meters, Feet, or Centimeters.
Warning
Changing Units does not convert anything. Positions, sizes and distances keep their numeric values — a surface 8 units wide stays 8 units wide. Choose your unit before you start measuring, and treat it as documentation for everyone else on the project rather than as a conversion tool.
Meters is the default, and the easiest choice for most venues: throw distances and surface sizes both land in comfortable single- and double-digit numbers.
Background
The color behind everything in the viewport, set with a color swatch; the hex value is shown next to it. This is purely a viewing preference — it is never projected.
A dark background is the honest choice for judging a projection, because it is closest to what an unlit room does to your eye. Lighten it only when you need to see the edges of dark geometry.
The scene graph offers five named presets instead of the picker — right-click the scene node and open Background for Dark, Charcoal, Midnight, Black and Gray.
Grid
A switch that shows or hides the ground-plane grid, and a Size field that appears when the grid is on.
The grid is drawn with one square per unit, so a Size of 20 gives you a 20 × 20 area of 1-unit squares. It is the fastest sanity check you have on scale: if your surface spans two grid squares and you know it is 8 m wide in the real room, your scene is not in meters.
The scene graph carries the same two controls on the scene node's right-click menu: Show Grid / Hide Grid, and a Grid Size submenu with the common values 10, 20, 40 and 100.
Note
The grid is hidden automatically while you are looking through a projector — a real projector has no editor grid in its output. Your setting comes back when you leave that view.
Selecting things
Clicking in the viewport in Object mode selects whatever is under the cursor:
- Click a projector body to select it. Its throw cone highlights as you hover, and the cursor becomes a pointer.
- Click a surface to select it.
- Click empty space to deselect everything and drop any attached gizmo.
Selection is shared with the Properties panel, the scene graph, and the projector selector in the top bar — selecting a projector anywhere selects it everywhere.
Tip
A projector sitting behind the surface will not steal a click meant for the surface. Moonshine picks whichever one is actually closer to the camera along the ray, so you can click the surface freely even when projectors ring it.
Press Esc to step back out of things, in order: detach a projector gizmo, detach a surface gizmo, drop the active warp vertex, then leave the projector view.
Where to go next
- Surfaces and models — add the geometry you are projecting onto
- Projectors — add projectors and match them to your real hardware
- The scene graph — the tree view of everything in the scene
- Display outputs — send each projector's render to a physical display