Moonblend
Blend overlapping projectors into one even picture. Moonblend calculates the blend from the scene, so there's nothing to paint or measure by hand.
When two projectors light the same part of a surface, that area gets light from both and shows as a bright band. Edge blending removes the band: each projector fades out across the overlap, so that together they add up to the brightness of one projector. Done by hand, this means setting a fade for every edge of every projector, then adjusting it until the seams disappear.
Moonblend does this for every projector at once. It works from what the scene already knows: each projector's position, lens, resolution, brightness in lumens and picture adjustments, the surface as it's warped, and anything you've painted into each projector's mask. It draws the result into each projector's mask, on a layer of its own, and updates it whenever the scene changes.
A new project is already blended
New Project places two projectors side by side over a long screen and runs Moonblend for you, so the moon test card it opens with is blended from the start. See Creating a project.
Getting started
- Make the scene match the room: each surface in its real position, and each projector at its measured position with its real lens, Resolution and Lumens (ANSI). Moonblend is only as accurate as the scene.
- Align each projector on the Warp tab, and for objects, the surface on the Scene tab. See Alignment.
- Click Mask in the top bar, and under Moonblend, click Calculate. After about a second the status reads Up to date.
- Check the blend on the wall with a white test pattern, as described under Examples.
From then on, Moonblend recalculates by itself whenever the projectors, the surfaces or the paint change.
How it blends
For each point on the surface, Moonblend first works out which projectors light it. A projector lights a point when the point is inside its beam, faces it, and isn't blocked by other geometry. Each of those projectors gets a share of the light at that point, and the shares always add up to one projector's worth. The closer the point is to the edge of a projector's image, the smaller that projector's share.
A projector fades out only toward an edge where another projector takes over:
- Another picture continues past the edge onto the surface, by at least a twentieth of the image height. The projector fades toward that edge. A narrower sliver, such as one left where two pictures don't quite meet at the end of an overlap, counts as misalignment, and the overlap stays straight up to it.
- Nothing lies beyond the edge: it runs off the surface, lands exactly on the surface's edge, or has only unlit surface past it. Moonblend leaves that edge alone.
An edge that hands over fades evenly along its whole length, so an overlap runs straight from one side to the other, right up to the surface's edge and past any notch in it.
Shadows are handled the same way. When something in front of the surface hides part of it from one projector, and another projector lights that part, the first projector fades out toward the edge of its shadow instead of stopping abruptly. A projector that drifts slightly then doesn't open a visible seam. The fade covers a band a tenth of the projector's image height wide beside the shadow. Outside that band, and anywhere no other projector reaches, the projector's light is unchanged.
The result:
- Each projector's light falls to nothing exactly at its own edge, where a seam would otherwise show.
- Where a projector is alone, its light is untouched.
- Across an overlap, one projector hands over smoothly to the next, with no step at either end.
This works for two projectors side by side, a row of them, several rows, or projectors at odd angles to each other and to the surface. See Examples.
Projectors don't turn pixel values into light in a straight line: half the pixel value gives much less than half the light. Moonblend corrects for this (a gamma of 2.2), so the middle of an overlap doesn't look dark. The result is dithered, so the fade doesn't show bands.
Even light: Uniformity
The blend above makes each overlap add up to one projector's worth of picture, but that isn't always the same light everywhere. A brighter projector, or one closer to the surface, lights its area more. Every projector is also brightest in the middle of its image and dimmer toward the corners, more so on a surface it hits at an angle. The Lux view shows this.
Uniformity, in the Moonblend section of the Mask tab, sets how far Moonblend goes to even this out:
| Uniformity | What you get |
|---|---|
| 0% (the default) | The picture blend described above. Each overlap adds up to one projector's worth, and each projector stays at full brightness where it's alone |
| 100% | The same light everywhere the projectors reach. Wherever a projector is brighter than the dimmest well-lit area, alone or overlapped, it's turned down to that level. Moonblend counts each projector's lumens, along with its brightness, contrast, gamma and color gains, so set each projector's lumens first |
| In between | A mix of the two: some evenness, some brightness |
Evening out the light costs brightness, because the whole show runs at the level of its dimmest area. Thin slivers lit at a grazing angle don't set that level: the dimmest one percent of the surface is left at full brightness rather than pulling everything else down.
Ctrl+Z in the Mask tab undoes a Uniformity change, in order with your painting, and Ctrl+Shift+Z redoes it. Ctrl+Z on other tabs doesn't affect it. See Layers and undo.
Even black: Native Contrast
Projectors can't make true black. At black, a projector still gives off a little light: 1/x of its white, for a native contrast ratio of x:1. Where projectors overlap, their blacks add up. In a dark scene, an overlap shows as a lighter band, and a corner where four projectors meet looks lighter still.
Set each projector's Native Contrast in its settings (see Projectors) and Moonblend evens out black as well. Wherever fewer projectors overlap, it raises their black to match the black of the brightest overlap, so black is the same everywhere.
- White isn't affected, whatever each projector's picture adjustments. A projector with its shutter closed still shows pure black.
- A projector left at
0counts as giving off no light at black. Where other projectors overlap it, it still takes its share of the lift. - If no projector has Native Contrast set, black isn't changed.
- The cost is contrast: black across the whole show rises to the level of the brightest overlap, however small that overlap is.
Painted masks
Moonblend takes your painted masks into account:
- Where you paint one projector out of an overlap, the other projectors light that area instead, so no hole opens up.
- Where every projector is painted out, the area stays as dark as you painted it.
When you paint, Moonblend recalculates with the paint.
Follow masks, below Uniformity, turns this off. With it off, Moonblend calculates the blend as if nothing were painted, and each mask only darkens what it covers on its own projector. Use this when you want to shape an edge by hand without the other projectors making up the light. The setting belongs to the project, and changing it recalculates the blend.
The Moonblend layer
A projector's mask has two layers:
| Layer | Made by | What it holds |
|---|---|---|
| Paint | You, with the brush and pen | What you want held back: spill, doorways, anything |
| Moonblend | Moonblend | Each projector's share of every overlap |
The two are kept separate. Recalculating Moonblend replaces only the Moonblend layer and leaves your paint untouched, and painting never changes the Moonblend layer. The projector's output is its picture with both layers applied.
The Moonblend section is in the Mask tab's sidebar, below Paint:
- Click Mask in the top bar.
-
Under Moonblend, check the status:
Status Meaning Not calculated Moonblend is off for this project, and no projector has a Moonblend layer Calculating… The show machine is calculating the layers. This takes about a second Up to date Every projector's layer matches the current projectors, surfaces, paint and Uniformity Could not calculate: … The calculation failed, and the message says why. Fix the problem and press Recalculate -
Set Uniformity (see Even light). It belongs to the project, so everyone working on it sees the same value.
- Click Calculate. The show machine calculates all the projectors' layers together, because each layer depends on every projector. From then on it keeps them up to date by itself (see below). Recalculate runs the calculation again right away.
- Use the On switch beside Moonblend to turn the blend on and off for the whole project: on the projectors, in this tab and in the Scene view's Blend, so what you see matches the wall. Turning it off keeps the calculated layers, so turning it back on is instant. Paint has its own On switch for the painted masks.
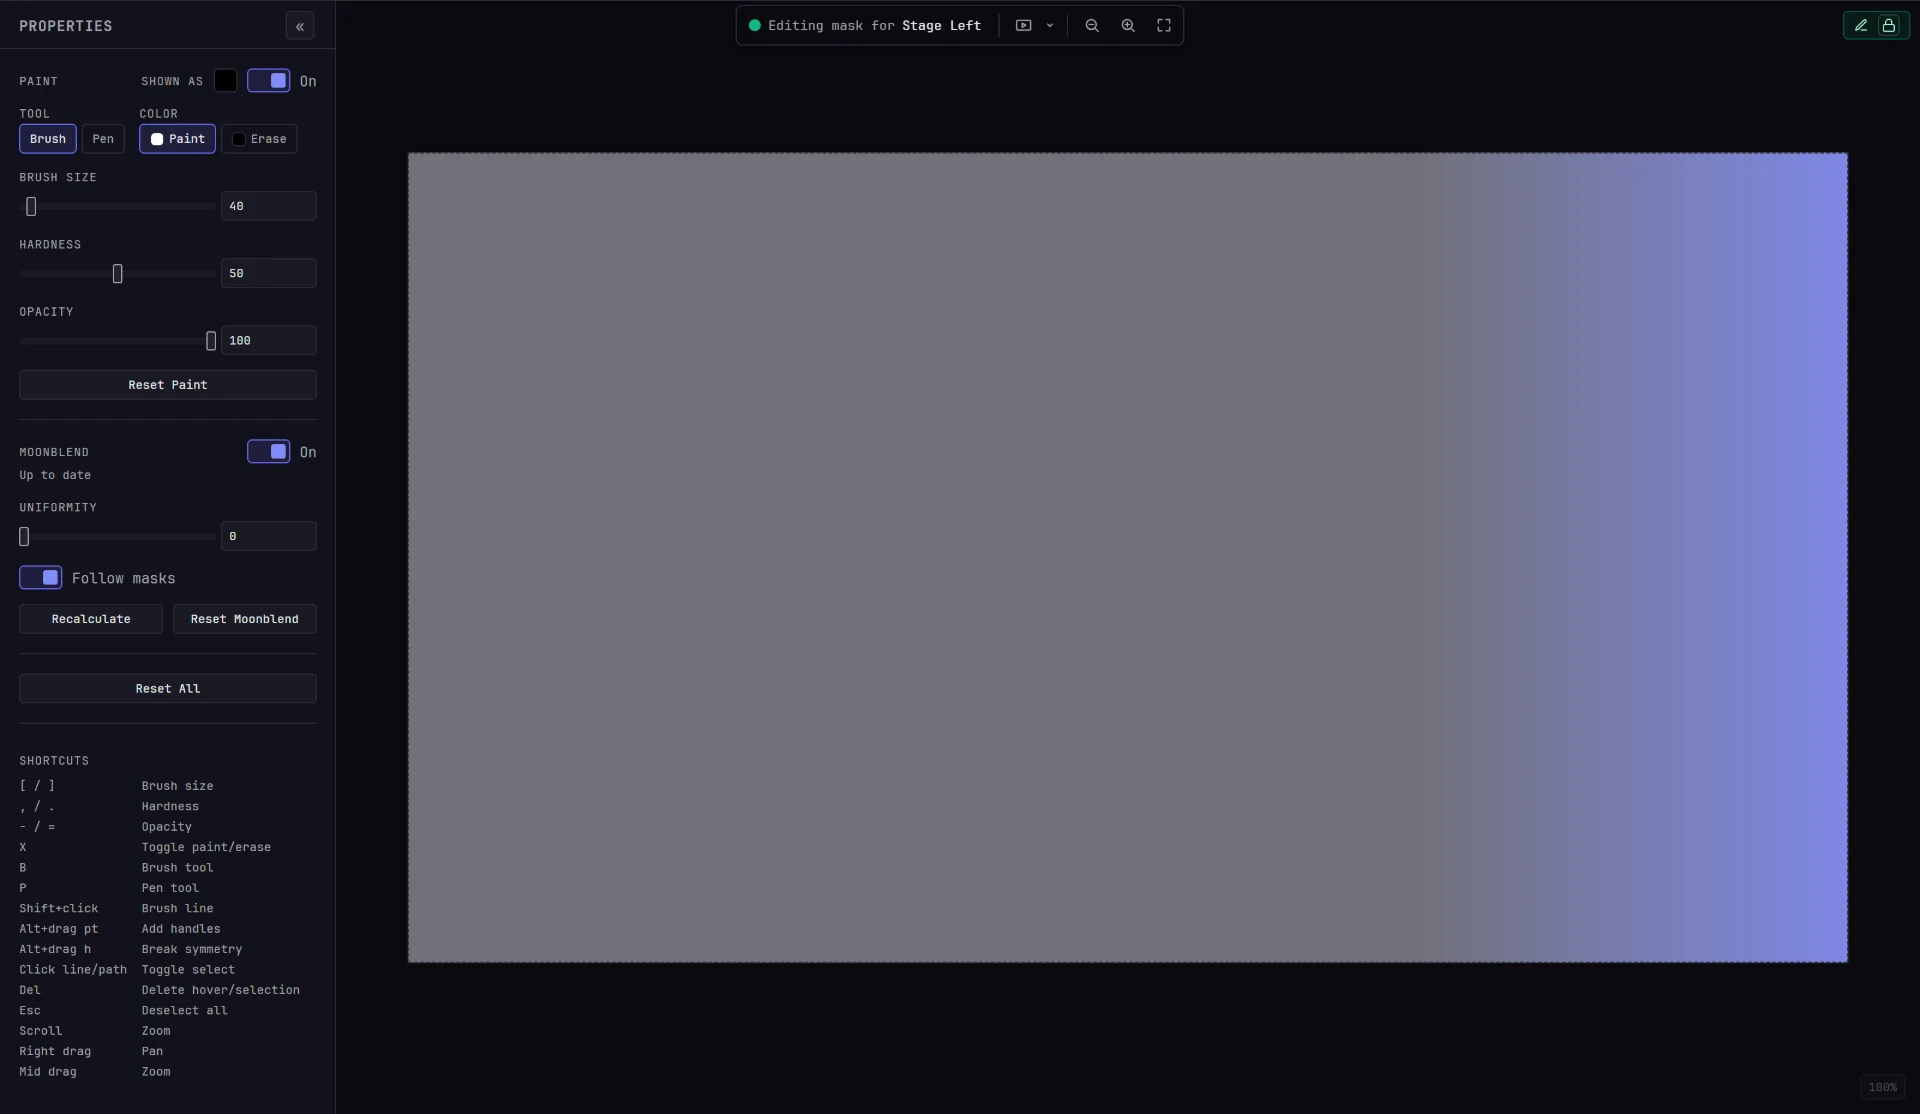
While the blend is on, the selected projector's layer is drawn over the paint area as a tint, showing where Moonblend fades that projector out. The tint is drawn in the projector's own frame: the rectangle is that projector's whole picture, not the surface. Where the tint is strong, the projector is faded out. Where there's no tint, it shines at full strength. A part of the picture that misses the surface has no tint, because there's nothing there to blend with. Paint is drawn over the tint, because a painted-out area gives no light and has nothing to fade.
Reset Moonblend removes every projector's Moonblend layer, not only the selected one's, and turns Moonblend off. It asks first. Moonblend stays off, even when the project is opened again, until someone presses Calculate. Reset All, below the Moonblend section, does the same and also clears the selected projector's paint.
When it recalculates
Once you've pressed Calculate, or created the project with New Project, the show machine keeps the blend up to date. It recalculates whenever something the blend depends on changes, whoever makes the change:
- a projector is added, removed, moved or re-aimed, or its lens, resolution, lumens, Native Contrast or picture adjustments change;
- a projector's 4-corner or bezier correction changes on the Warp tab;
- a surface changes: a 3D warp, or a surface moved, resized, replaced, hidden or shown;
- paint changes on any projector, while Follow masks is on;
- Uniformity or Follow masks changes.
Moonblend waits a moment for changes to settle. During a long drag it updates about every two seconds, so the blend follows your edit a step behind. Every projector switches to its new layer in the same frame, so the wall never shows half a blend. The calculation is spread over many frames, so the show keeps its frame rate while it runs. After Reset Moonblend, nothing recalculates until someone presses Calculate again.
Seeing it before the wall
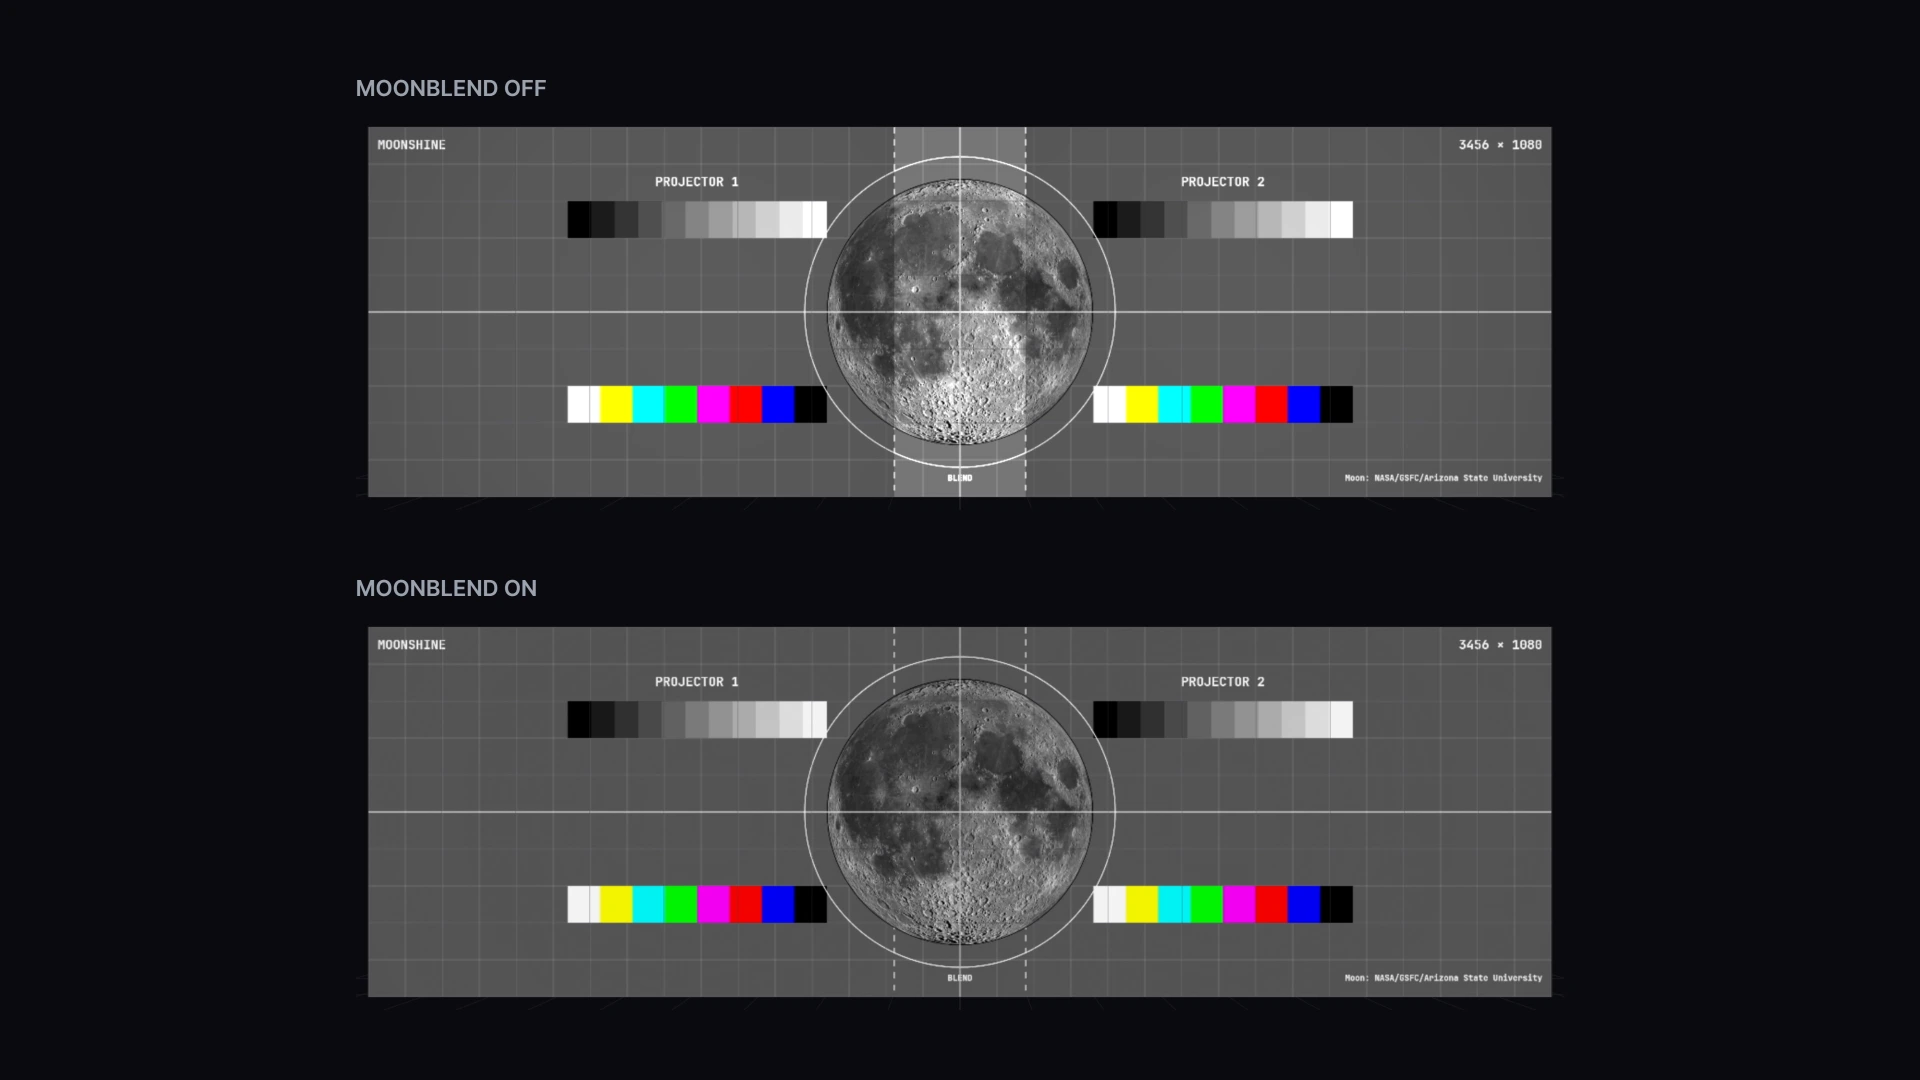
In the Scene view, Beams and Lux show overlaps at double brightness, which is how projectors look with no blend. Switch on Blend in the viewport toolbar to see the light after each projector's Moonblend layer, as the projectors output it. If Moonblend hasn't been calculated, or the last calculation failed, switching Blend on calculates it, and the toolbar reads Calculating… until it's ready, or says why it couldn't. Blend is the same switch as On in the Mask tab's Moonblend section, so switching it off turns the blend off on the projectors too.
With a good blend, the bright band disappears. In Lux, the statistics panel and the cursor readout measure the blended light, and at Uniformity 100% the panel's Uniformity figure shows how even the blend came out. See View modes.
Examples
Each example assumes a scene that matches the room, as in Getting started. Most start from New Project, so you can try them before you build your own.
Try them away from a show
A new project becomes the open project for everyone connected, and the wall changes with it. See Creating a project.
Check each one the same way:
- In Projectors → Test Pattern, choose Solid with the White swatch, All Projectors, and Drawn On: Surface. A pattern drawn on the Projector bypasses the blend and shows every overlap at double brightness.
- Look along every overlap from where the audience will be. No band should look brighter or darker than the rest.
- Switch the pattern to Grid. Lines should stay single across every overlap. A doubled line is an alignment problem, not a blend problem.
- In the Scene view, use Lux with Blend on to measure the blended light.
- Set Test Pattern back to Off. A test pattern shows for everyone connected, and on the wall.
Three or more in a row
The rig: a long screen with a row of projectors side by side, each overlapping the next by about a fifth of a picture.
- Click New Project, set Initial Projectors to
3or more, and click Create. - That's all. Moonshine lays the projectors out over a screen they exactly cover, and calculates the blend.
To build the same row in your own scene, place the projectors so each one overlaps the next by 15–25% of a picture's width, and press Calculate.
On the wall: one picture. Each projector in the middle fades out toward both of its neighbors. The two at the ends fade only toward their one neighbor, because their outer edges land on the ends of the screen with nothing beyond them to blend with.
Watch for:
- An overlap under about 15% leaves little room to fade and shows every alignment error. Over 25% spends pixels and light twice.
- Light that spills past the ends of the screen isn't faded. Paint it out where it lands on something.
- Moonblend calculates every projector together, so a projector you add to the row later is blended in automatically.
A 2 × 2 grid
The rig: two rows of two, overlapping by a fifth across and down. In the middle, all four pictures overlap.
- Click New Project with Initial Projectors at
2and Resolution at 1920 x 1080. You get two projectors side by side, each picture 4.5 m high, already blended. - Right-click each projector's body in the viewport and choose Duplicate. Each copy appears 0.5 m above its original.
- Set each copy's Position Y to
6.35. The top row is now 3.6 m above the bottom one, so the rows overlap by 0.9 m, a fifth of a picture. - Select Screen in the scene graph, and set its Height to
8.1and its Position Y to4.55, so it covers both rows exactly.
Moonblend recalculates after each change.
On the wall: one picture, with no bright cross where the overlaps meet. The four projectors share the middle.
Watch for:
- All four pictures must line up in the middle, so alignment errors show there first. Check it with the Grid pattern.
- In a dark scene, four blacks add up in the middle, making it the brightest black on the wall. With Native Contrast set, Moonblend raises black everywhere else to match, which costs contrast across the whole show. See Even black.
Projectors at an angle
The rig: projectors that can't hang square to the screen, placed off to the sides and turned back toward it. Each picture lands as a trapezoid, and the overlap between them is a wedge rather than a strip.
- Start from New Project's pair, at 1920 x 1080.
- Set Projector 1's Position X to
-7and its Rotation Y to-17.6. This turns it back toward the middle of the picture it had. - Set Projector 2's Position X to
7and its Rotation Y to17.6.
On the wall: each picture is taller toward the middle of the screen, where it spills past the top and bottom, and dimmer there, because the light travels farther. Moonblend fades across the overlap as it now lands, and at Uniformity 100% it also evens out the dimmer far sides.
Watch for:
- The short side of a trapezoid can leave corners of the screen unlit; in this example, the corners at each end. Moonblend can't light what no projector reaches. Check the corners in Beams, and lower each Throw Ratio slightly to cover them.
- A projector hung high with its lens shifted down, rather than tilted, keeps a rectangular picture. Moonblend blends it the same way.
Projectors that do not match
The rig: a pair where one projector is brighter than the other, or has a different resolution.
Brighter and dimmer. In New Project's pair, set Projector 2's Lumens (ANSI) to 6000 and leave Projector 1 at 3000. Projector 2's side of the screen now gets twice the light, and Uniformity decides what Moonblend does about it:
| Uniformity | On the wall |
|---|---|
| 100% | Even. Projector 2 is turned down to match Projector 1, both alone and in the overlap. The show is as bright as Projector 1 can make its side |
| 50% | Projector 2's side is brighter, about halfway between the two |
| 0% | No band, but Projector 2's side is twice as bright, and the light ramps from one level to the other across the overlap |
Lowering Uniformity gives the brighter projector back its light. It never makes the dimmer side brighter, because no projector can go past its own full white.
Different resolutions. Set Projector 2's Resolution to 1280 × 800, a 16:10 projector. At the same throw, its picture is as wide but taller, so it spills past the top and bottom of the screen. Moonblend works in each projector's own pixels, so there's nothing else to set.
Watch for:
- A spec sheet gives a new projector's lumens. Lamp hours and eco modes give less. If one side still looks brighter on the wall at 100% while Lux with Blend reads even, the lumens figures are wrong, not the blend: lower the dimmer projector's Lumens (ANSI) until the wall looks even. Lowering the brighter projector's Brightness doesn't help, because Moonblend counts Brightness and evens the difference straight back out.
- Moonblend evens out light, not color. Match the whites with Red Gain, Green Gain and Blue Gain before you judge the blend.
- A 16:10 projector entered as 16:9 covers the wrong area in the scene, and is blended for that wrong area too.
A stack
The rig: two identical projectors hung together, both covering the whole screen, for twice the light.
- Click New Project with Initial Projectors at
1and Resolution at 1920 x 1080. You get one projector, a screen exactly the size of its picture (8 × 4.5 m), and no blend. - Set the projector's Throw Ratio to
1.4, so its picture spills slightly past every edge of the screen. - Right-click the projector's body and choose Duplicate. The copy appears 0.5 m above it, with the same lens.
- Set the copy's Lens Shift Y to
-21. This moves its picture down 0.5 m, onto the first one. In your own rig, use the second projector's measured position and its lens shift. - In the Mask tab, set Uniformity to 100% and press Calculate.
On the wall: the combined light of both projectors, evened out. In Lux, switching Blend on evens out the screen without halving its light.
Watch for:
- Keep Uniformity at 100%. At 0%, Moonblend shares the stack like any other overlap, and the two together give one projector's worth of light.
- Every edge of both pictures must run off the screen or land exactly on its edge. If an edge lands inside the screen, even slightly, with the other picture continuing past it, Moonblend fades that projector toward it. At 100%, the whole stack then drops to about one projector's light: in Lux, switching Blend on roughly halves it. Paint the spill out instead of pulling the pictures in.
- Converge the two pictures on the Warp tab until lines are single, using small corrections that keep both pictures spilling past every edge.
- Moonblend evens out the whole show, so a stack that covers only part of a blended wall is turned down to match the rest, at any Uniformity. Moonblend can't keep one area brighter than the rest.
A curved screen or a dome
The rig: a surface that isn't flat, imported as a 3D model at its real size. Two layouts that blend cleanly:
| Surface | Layout |
|---|---|
| A curved screen: a third of a circle 12 m across, 3 m high | Three projectors near the circle's center, turned 30° apart, their pictures overlapping by about a fifth |
| A dome, 10 m across | Four projectors around the rim, each throwing across and up at the far side, and a fifth in the middle, aimed straight up at the top, where all four overlap it. Roll the fifth 45° (Rotation Z) so its long sides reach all four evenly |
- Upload the model (FBX, OBJ or GLB) on the Assets tab and drag it onto the scene graph. Place it in its real position, at its real size. See Surfaces and models.
- Hide any part of the model that isn't in the room, under Parts in the Properties panel. No projector lights a hidden part, and Moonblend leaves it out.
- Place and aim the projectors, and press P to check each one's view.
- Press Calculate in the Mask tab.
On the surface: each fade follows the curve, because Moonblend works from the surface as modeled. At Uniformity 100%, areas that are farther away or hit at a steeper angle are evened out with the rest.
Watch for:
- The model must match the venue. A model at the wrong scale or in the wrong place blends perfectly in the Scene view, and wrongly on the real surface.
- Where the side of one picture crosses the side of another inside the surface, as where a dome's rim pictures meet, the handover between them changes quickly near the crossing. The light still adds up, but alignment errors show more there.
- Light that hits the surface at a grazing angle is dim. At 100%, the whole show comes down to the dimmest well-lit area, so aim each projector as squarely at its part of the surface as you can.
- While a model is still loading on the show machine, Moonblend waits for it and reads Calculating….
A wall and the floor
The rig: two surfaces meeting at a corner, both lit: a wall, and the floor in front of it. Two projectors above and in front each put half their picture on the wall and half on the floor, overlapping down the middle of both.
- Add the floor as a second surface: press + in the Scene's toolbar and choose Plane.
- Lay it flat with Rotation X at
-90, size it, and move it so its back edge meets the wall. - Press Calculate, or let Moonblend recalculate if it's already on.
On the wall and floor: one blend, running across the corner. Every projector lights every visible surface, and Moonblend blends them all together.
Watch for:
- A surface hidden with its eye icon in the scene graph isn't lit and isn't blended. Hide a surface only if it isn't in the room.
- Where a projector's light grazes one of the two surfaces almost edge-on, Moonblend can mistake the corner for the edge of a shadow. See Limits. Projectors that hit both surfaces more squarely avoid this.
Something in front of the screen
The rig: a column, a pillar or a piece of set standing in front of the screen, with a projector on each side of it. It hides a different strip of the screen from each projector, and the other projector lights each strip.
- Add the obstruction to the scene as a surface, in its real position: a Plane or a Box at its size, or its model. Keep it visible.
- Press Calculate, or let Moonblend recalculate.
On the wall: no outline of either shadow. Moonblend works out each projector's shadow, has the other projector light it, and fades each projector toward the edge of its own shadow, so the handover has no step. See How it blends.
Watch for:
- Moonblend knows only what's in the scene. An obstruction that's left out, or hidden, casts a shadow on the wall that the other projector could have filled. If you can't model it, paint it out instead, as in the next example.
- The obstruction is a surface like any other, so the projectors light it too. To keep it dark, paint it out of both projectors.
Holding light back in an overlap
The rig: a lighting bar hangs in front of the screen, inside an overlap. Projector 1's light hits it; Projector 2's clears it.
- Click Mask in the top bar and select Projector 1.
- Paint over the bar with a soft brush. See Brush masking.
- Moonblend recalculates with the paint.
On the wall: no light on the bar, and no shadow of it on the screen. Moonblend gives the screen behind the bar to Projector 2, at full strength.
Watch for:
- Inside an overlap, paint with a soft edge (a low Hardness). A hard edge makes the handover a step, and any misalignment shows as a line.
- Paint hands an area over only where another projector lights it. Where a projector is alone, painting it out leaves a hole.
- To keep an area dark, such as a doorway, paint it out of every projector that reaches it. It then stays as dark as you painted it.
- Judge paint on the wall. The Scene view's Blend preview doesn't show it.
When it does not blend
The Moonblend section of the Mask tab says what went wrong. Until a calculation succeeds, every projector keeps its layer from the last calculation that did.
| It reads | Why | What to do |
|---|---|---|
| Could not calculate: Projector 2's keystone or bezier warp folds over itself | That projector's 4-corner or bezier correction folds part of its picture back over itself, and a fold can't be blended | On the Warp tab, undo the move that caused the fold with Ctrl+Z, or drag the crossed corners or points apart |
| Could not calculate: the screen's model could not be loaded: … | A surface's 3D model didn't load on the show machine | Check the file against Supported file formats, export it again if needed, and swap it in with Replace File… |
| Could not calculate: anything else | The show machine couldn't finish the calculation | Press Recalculate. If it fails the same way again, send the message to support@tridant.io |
| Calculating…, and no further | A surface's model is still loading, and Moonblend waits for it | Wait for the model to load |
| Not calculated, on a project you had blended | Someone pressed Reset Moonblend or Reset All, or the project was blended in an early version of Moonshine | Press Calculate |
When the status reads Up to date but the wall still looks wrong, the scene and the room don't match. Compare the wall with the Scene view's Blend preview:
| On the wall | Why | What to do |
|---|---|---|
| A bright band down an overlap that the preview shows as even | The overlap on the wall is wider than in the scene: a projector or the surface isn't where the scene says | Line them up again: position, rotation and lens shift, then keystone. Moonblend follows |
| A dark band down an overlap | The overlap on the wall is narrower than in the scene | The same |
| Lines doubled across an overlap | Alignment, not the blend | Align on the Warp tab |
| Bands only in dark scenes | Black adds up where projectors overlap | Set each projector's Native Contrast. See Even black |
| One side brighter, with no band | Uniformity is below 100%, or a lumens figure doesn't match the projector's real output | See Projectors that do not match |
| Everything dimmer than you expected | At 100%, the whole show comes down to its dimmest well-lit area | In Lux with Blend off, find the dimmest part of the surface. Re-aim or add light there, or lower Uniformity |
Limits
- Moonblend works from the scene, so it's only as good as the scene's match to the room. Line up the projectors and the surface first, and blend last.
- Moonblend treats a keystone or bezier mesh correction as putting the picture where the scene says it lands, as when a projector hangs slightly off its settings. For light, a keystone that squeezes the picture counts as a projector standing farther back, with a little less light. A bezier bend inside the four corners moves the picture without changing its light. To keep light off something, paint it out rather than pulling the keystone in. A correction that folds the picture over itself can't be blended: the calculation stops and names the projector.
- Where two surfaces meet in an inside corner and a projector's light grazes one of them almost edge-on, Moonblend can mistake the corner for the edge of a shadow. Where another projector also lights that area, Moonblend then fades the first projector toward the corner. A projector that hits both surfaces more squarely avoids this.
- An edge that hands over anywhere fades along its whole length. Suppose one edge of a projector hands over to the projector beside it and, further along, meets a second projector's overlap with only unlit surface beyond it. The fade then reaches into that second overlap too, and the split there leans. To avoid this, extend the second projector's picture past that edge, or keep that edge off the surface.
- When it evens out black, Moonblend counts a projector's black only where its picture lands. A keystone leaves a band between the picture and the edge of the projector's frame that still gives off some light at black, and Moonblend doesn't count it. Black raised by a projector's picture adjustments (a contrast below 1) isn't counted either.
- The Scene view's Blend preview and the Lux readouts show the blended light only. They leave out painted masks and black levels.