Show control (OSC)
Drive Moonshine from a lighting desk, a show-control program or a button box over OSC, or from a MIDI controller over MIDI. A message can start, pause or stop a cuelist, go to the next cue, black out, move a component's parameter, or set a value on a projector, a surface or a live input, such as a projector's brightness or shutter, a surface's position, or a camera's settings. Each action is a control on the Control tab, and you can also press it on screen.
Turn OSC on
OSC is off until an administrator turns it on. OSC messages carry no sign-in, so anything on the network that can reach the port can send one.
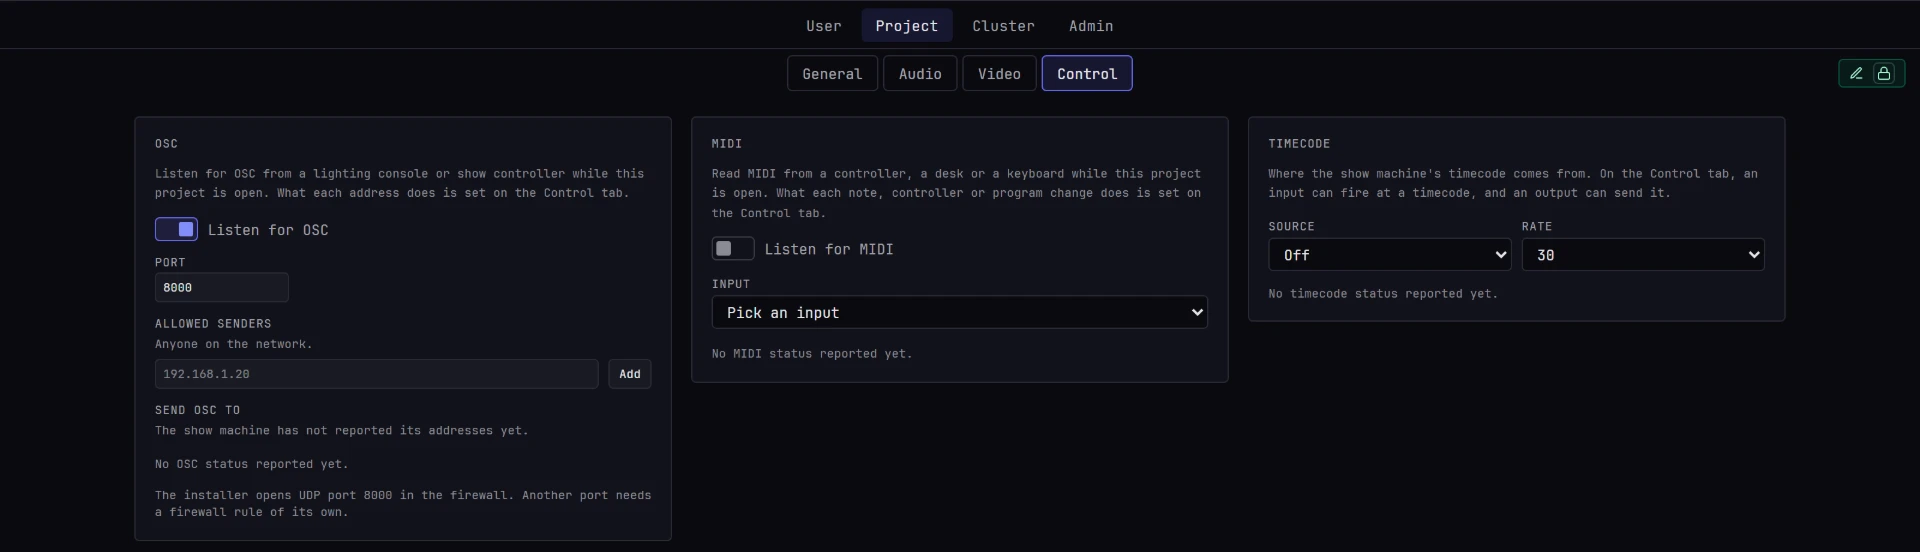
- Open Settings → Project → Control. OSC is the first card.
- Turn on Listen for OSC. The port is
8000unless you change it. - Optionally, list the IPv4 addresses allowed to send. If the list is empty, any address on the network can send.
The page shows the show machine's addresses: point your desk at one of them, on the port. The Windows installer opens UDP port 8000 in the firewall; any other port needs a firewall rule of its own. On a Mac, the installer package lets Moonshine accept connections through the macOS firewall.
These settings belong to the project. Each project has its own listener, port and allowed senders, and opening another project switches the listener to that project's settings, or closes it.
The Control tab
The Control tab is a grid of controls, 16 cells wide: buttons, faders, knobs and jogs. Each control can listen for a message from your desk and do one thing. The tab has three sub-tabs:
| Sub-tab | For |
|---|---|
| Play | Pressing the controls on screen, with a finger or a mouse. The tab opens here |
| Edit | Laying out the controls, and setting what each one listens for and does |
| Learn | Building controls from your desk: move a control on the desk, then click what it should do. See Learn |
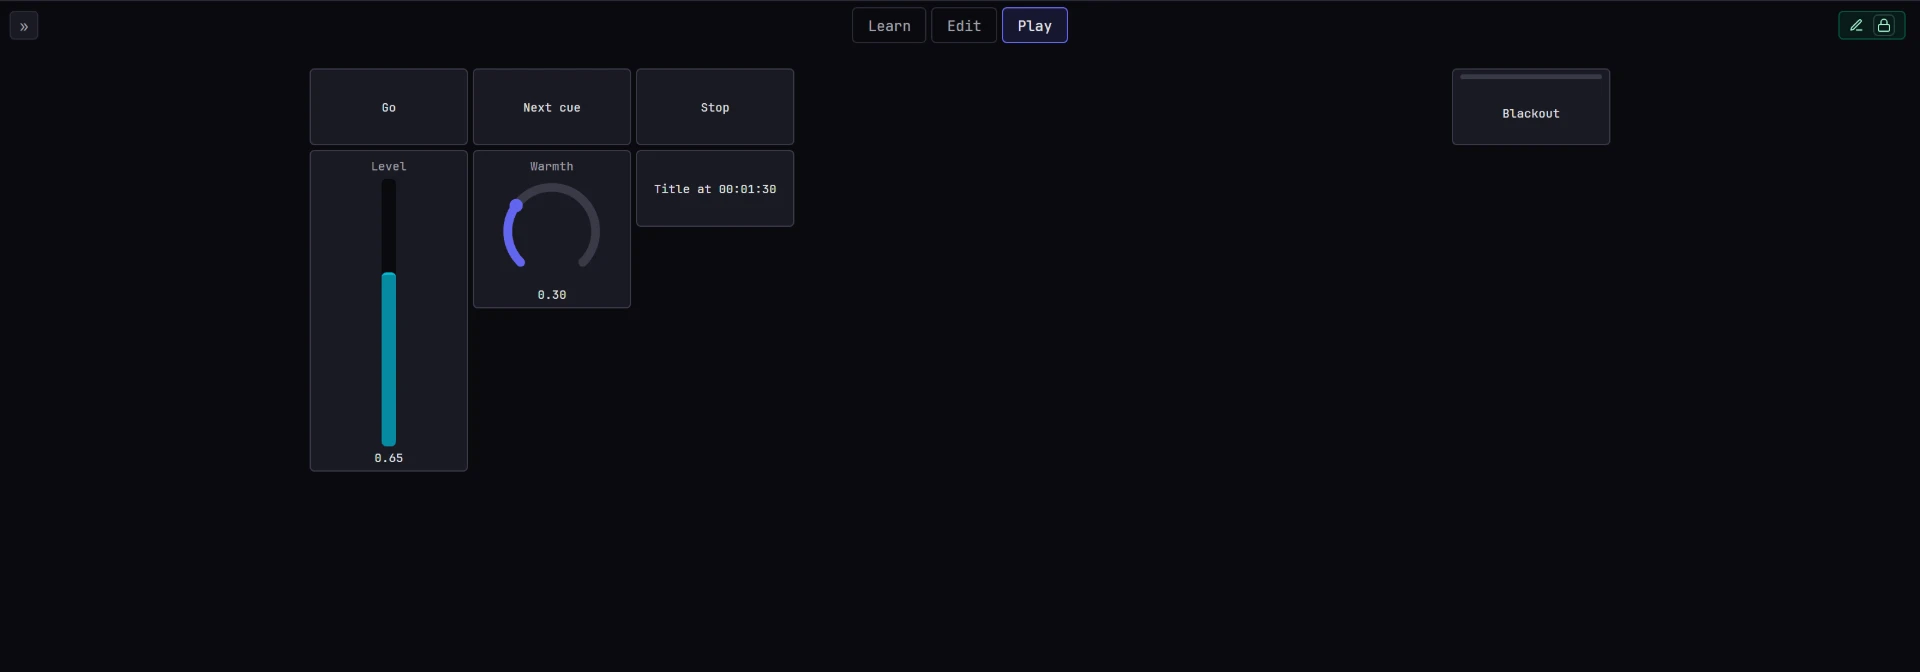
Press on screen
On Play, press a button or drag a fader or knob, and the show machine responds exactly as it would to a message from your desk: a press plays the cuelist, a fader moves the parameter. This works while someone else has the Cue tab open, as a desk does. Each press appears in the Incoming column with your name.
Play folds the sidebar so the controls get the full width. To see the Incoming column there, open the sidebar with » at the left of the strip. Learn and Edit open it automatically.
On Play and Learn, the page shows only your controls, without the empty grid around them, as large as the page allows up to a set size. The Control drawer sizes them the same way. If the page is too small for every control to show its name, it scrolls instead of shrinking them further. A name too long for its control ends in "…"; point at the control to read the full name.
Each control shows its state. A fader or knob shows its value, and moves when your desk moves it. A button shows each press, from the screen or from your desk.
Momentary and toggle buttons
A button is either momentary or toggle:
- A momentary button is on while you hold it. It fills with its color while it's held, on screen or on your desk, and goes dark as soon as you let go. A quick tap flashes briefly, so you see every press. Holding a momentary Blackout button blacks out until you let go.
- A toggle button stays on until the next press. A bar across its top lights in the button's color while what it drives is on: the blackout, the cuelist playing, a parameter's switch, a projector's shutter open. The button reacts as soon as you press it, and the light changes once the show machine has acted.
A toggle needs something with an on and an off: the blackout, a cuelist's Play, a parameter's switch or a number (on at the top of its slider, off at the bottom), an on/off command, a projector's, surface's or live input's value, or nothing yet. Next, Previous, Pause, Stop, Play cue, Exit Hold, the marker jumps, and Pulse and Menu parameters act once per press, so they're always momentary. The Inspector tells you this, and changes a toggle given one of these actions to a momentary button.
A desk button that latches works as a toggle. Some desk buttons stay down when pressed and send their off on the next press. On a toggle, that off turns it off, so one press turns it on and the next turns it off.
The Control drawer
Your controls are also available as a drawer in the bottom panel, beside the Scene Graph and the Timeline, so you can press them from any tab. Open it with the Control pill in the status bar or C, and close it with the ✕ at its top right, the pill or the key. With all three drawers open, they share the width in thirds; drag a divider to give one more room. Each tab remembers whether you left the drawer open.
The drawer is always in Play mode, with your controls laid out as on the surface. It shows every control until you pin one, and then only the pinned ones, side by side in their surface order. To pin a control, click the circle at its top-left corner on Edit (it appears when you point at the control, and stays filled once pinned), or turn on Pinned in the Inspector. Pins belong to the project, so the drawer is the same on every device in the show. Pinning doesn't change the surface.
Auto, at the drawer's top left, fits the controls to the drawer, up to the size the Control tab uses. In a short drawer, Auto uses as many rows as fit and continues the rest to the right, shortening tall faders to fit. If they still don't fit, the drawer scrolls sideways rather than shrinking a control so far that its name no longer fits.
To set the grid yourself, type a number of columns and rows beside Auto. More columns or rows make the controls smaller, down to the same minimum; fewer rows continue the controls to the right. The columns never drop below what the controls need. The size is saved on this computer.
To lay out the drawer differently from the surface, choose Drawer beside Surface at the top left on Edit, then move and resize the controls as you do on the surface. The drawer keeps that layout for the project, and scrolls when it's too short instead of rearranging it. Match the surface switches it back to mirroring the surface.
Build the surface
On Edit, set the grid's columns and rows in the two boxes beside Add. Fewer cells make every control larger, up to the set size, and more make them smaller. The whole grid fits the page until its controls would be too small to show their names, and then the page scrolls. You can't make the grid smaller than its controls need. The grid size belongs to the project, so it's the same on every device.
- Press Add for a new button, or click a control to select it.
- Drag a control to move it one cell at a time. Drag the handle at its corner to resize it.
- Drop a control on another: they swap if the other fits where you came from. Otherwise, whatever is underneath moves to the nearest free cells, and the grid grows downward if it has to. You see where everything will land before you let go.
- The arrow keys nudge the selected control, swapping with a neighbor the same way.
- To remove a control, press Delete, or right-click it on Edit or Learn and choose Remove. Moonshine asks first.
To set up several controls at once, for example to give a row of buttons the same MIDI channel, click the first one on Edit and Shift-click the last. Every control between them is selected and outlined: along a row, down a column, or in the rectangle between them. Ctrl-click (Cmd-click on a Mac) adds or removes a control, a plain click selects one on its own, and Esc clears the selection.
Drag any of the selected controls, or press the arrow keys, and they all move together. Drag the corner handle and they all grow or shrink by the same amount, keeping their arrangement. Their pin circles pin or unpin them all.
With several controls selected, the Inspector shows how many and edits what they share: choose a face, a behavior, a color, what they listen for or what they do, and every selected control takes it. Where they differ, a setting shows — until you choose a value for all of them. Settings that belong to one control alone (its name, OSC address, MIDI note or controller number, timecode, ranges and spans) are hidden while several are selected. Delete removes them all after one confirmation, and Duplicate copies each one.
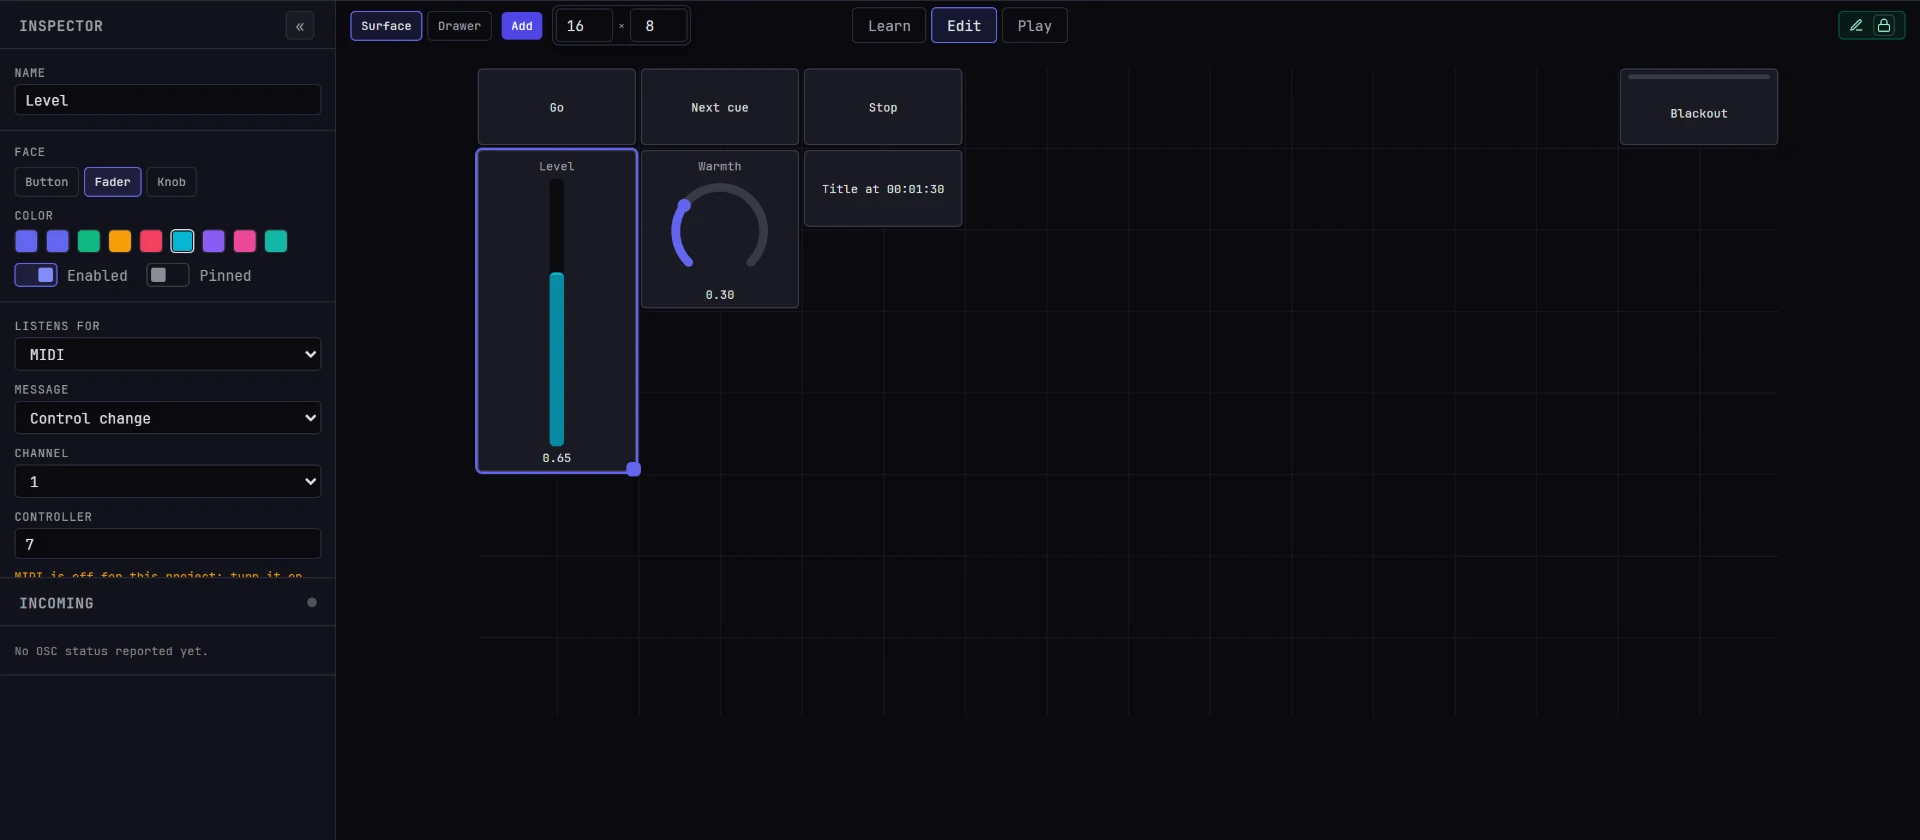
The selected control opens in the Inspector, in the sidebar on the left:
| Setting | Does |
|---|---|
| Name | What the control shows on its face. Left empty, a control shows what it listens for, then takes the name of its action (Blackout, Play · Main show, Brightness, Go to Scene). A name you type yourself is never replaced |
| Face | Button, Fader, Knob or Jog, a wheel for a desk's pair of controllers (see Jogs). A button's Behavior is Momentary (on while you hold it) or Toggle (one press turns it on, the next off): see Momentary and toggle buttons. Toggle is grayed out when the button's action has no on and off; point at it to see why. Color sets the color it lights up in |
| Enabled | When off, the control is dimmed and does nothing |
| Pinned | Puts the control in the Control drawer. The circle at a control's top-left corner on Edit does the same, and is filled when pinned |
| Listens for | Nothing (only a press on screen triggers it), an OSC address, a MIDI message, or a Timecode |
| Does | Nothing, a Cuelist command, Blackout, a Source parameter, a Command (anything the / command palette can do, grouped as the palette groups them), or a Value: a projector's, a surface's or a live input's, chosen under Of |
Controls from a project made before the Control tab had a grid are placed on the grid in order, and keep that place once you edit anything.
What a control does
| Does | Action |
|---|---|
| Play, Pause, Stop | Acts on the chosen cuelist. Pause and Stop act only on the cuelist that's playing |
| Next, Previous | The cuelist's next or previous cue, looping as the cuelist loops |
| Play cue | Plays the cuelist from the cue you choose |
| Exit Hold | Releases the hold marker the show is looping on: the current pass finishes and the show plays on through the marker. Map a MIDI or OSC Advance here |
| Jump to marker, Next marker, Previous marker | Takes the show to the marker you choose, or to the next or previous marker from where it is, with the cuelist's jump transition. Stepping back from just past a marker goes to the one before it, and from before the first marker goes to the start |
| Scrub | For a jog: turning it moves the show's playhead forward or back, one frame per fine step, and the picture follows. See Scrub with a jog |
| Blackout | Takes every projector to black: while you hold a momentary button, or until the next press of a toggle. See Blackout |
| Source parameter | One of a .tox component's parameters, or one of a web page's settings. See Live sources |
| Command | Something the browser does: go to a tab, undo, choose a Scene tool or a display mode, toggle snapping, play the open cuelist or step it, open a drawer. Pressed on screen, it runs in your browser. From your desk, it runs in every signed-in browser, as if each had chosen it from the / palette. An on/off command (the blackout, a drawer, a tool) makes the button a Toggle, lit while it's on |
| Value | A projector's Brightness, Contrast or Gamma, or its Shutter open or closed; a surface shown or hidden, or moved, turned or scaled along one axis (Position X, Rotation Y, Scale Z and so on); or one of a live camera's or NDI source's settings, such as its Bandwidth. Under Of, choose what it's a value of (Projector, Surface or Live input), then which one, and the value |
A fader, knob or jog can only drive a source parameter that takes a number, or a value. A jog can also Scrub a cuelist: choosing Cuelist command on a jog makes it scrub. Choosing Blackout, any cuelist command on a fader or knob, or a cuelist command other than Scrub on a jog turns the control into a button.
On a value, a fader, knob or jog covers the value's whole range, or the part you set as its Span: 0.2 to 0.8 of a projector's brightness, or -5 to 5 m of a surface's position. On a switch, it turns the switch on past the middle of its travel. On a menu, it steps through the options in order along its travel. On screen it shows where the value is, so it moves when someone changes the value in its panel, in another browser or from a desk.
A button on a value sets the top of the span (or on, or the option you chose) while it's held, and the bottom (or off, or the first option) when it's released. A Toggle button switches between the two on each press, and lights while the value is on or in the top half of its span.
A value set by a control is kept, as if you'd set it in its panel, and every panel shows it. It's set even while someone else is editing that projector or surface, as a desk message always is.
Press and release. A message with no value, or with a first value above 0, is a press. A message with the value 0 is a release, as when a desk button is let go. Playback actions happen on the press only, so a button that sends 1 when pressed and 0 when released acts once. A momentary Blackout or parameter button turns on with the press and off with the release.
A fader or knob gives a parameter the first number in the message. Give the control an input range (say 0 to 127) to spread that range across the parameter's slider. Without one, the number is used as sent, and an on-screen fader or knob covers the slider with its own travel. A button turns a parameter's switch on, or a number to the top of its slider, while it's held, or flips it on each press if it's a toggle. A Pulse parameter is pressed like a playback action. Text parameters can't be driven.
A change to a component's parameter made over OSC, MIDI or the screen isn't saved: the value set in the Assets panel comes back the next time the component loads.
What a control listens for
An OSC address must match exactly, including capital letters. MIDI and timecode are covered below. While OSC is off for the project, the Incoming column says so, with a link to Settings → Project → Control to turn it on. The Inspector does the same for MIDI and timecode when a control listens for one that's off.
Learn
Open the Control tab's Learn sub-tab. A bar slides in above the page, beside the sidebar, reading Learning · move a control on your desk. It stays on every tab until you leave Learn.
- Move a control on your desk: press a button, turn a knob or push a fader. A control appears on the surface, listening for that message, with no action yet. The bar reads Heard MIDI CC 7 · ch 1 as a fader · click what it should do · Esc.
- Within three seconds, click what the control should do: the Blackout button, a tab, Undo, a Scene toolbar button, the status bar's Scene Graph, Timeline or Control, the cuelist transport's play, next or previous, a component's parameter on the Assets tab, a projector's Brightness, Contrast, Gamma or Shutter on the Projectors tab, a surface's Position, Rotation or Scale field in the Scene sidebar or its eye in the scene graph, or a live input's setting in Settings → Project → Video. The click only binds the control: the tab doesn't open, the blackout doesn't toggle and the slider doesn't move. The bar reads Bound MIDI CC 7 · ch 1 to Blackout (or to Brightness · Projector A), and the control takes that name until you give it one of your own. A button bound to a menu sets the option the menu showed when you clicked it.
- Press Esc to discard a control you didn't mean to bind. When nothing is waiting, clicks work as usual, so you can go to the Scene tab first and press the desk control once you're there.
Moonshine guesses the control's face from what your desk sends, and keeps refining the guess for three seconds, or until you edit the control:
| Your desk sends | The control is |
|---|---|
| A note (a key, a pad) | A Momentary button. Hold it for more than 0.4 s before letting go and it becomes a Toggle |
| A controller (a fader, a knob) | A fader. A controller that only ever sends 0 and 127, or 0 and 1, becomes a Toggle button |
| Two controllers 32 apart, together (a wheel's coarse and fine, such as CC 40 and CC 72) | One Jog for both. See Jogs |
| A program change | A Momentary button |
| An OSC message | A Momentary button if it has no value, a Toggle button with 0 or 1, and a fader with any other number |
A toggle bound to something with no on and off (a tab, Next, a Pulse parameter) becomes momentary, and the bar says so.
MIDI can't tell a knob from a fader, so to show a knob on screen, choose Knob in the Inspector. If you move the same desk control again, the control on screen follows it instead of creating another.
The Incoming column, in the Control tab's sidebar on Learn and Edit, lists each message as it arrives: its address or MIDI message and values, and the control it triggered if that control has a name of its own. Messages are grouped under the device or sender that sent them. A fader sweep or a jog turn is a single line showing its current position. A message that triggered nothing is dimmed.
The column's dot flashes as each message arrives, and beside it is the time since the last one, such as 43s, so you can see at a glance whether your desk is reaching the show machine. Until OSC or MIDI is connected, the column says why and where to turn it on. On any sub-tab, point at a line and click Learn at its end to make a control for that message, with no action yet, open in the Inspector.
A message from an address that isn't on the allowed list shows as refused and does nothing. While someone else is editing the controls, nothing is learned, and the bar says who.
Send OSC
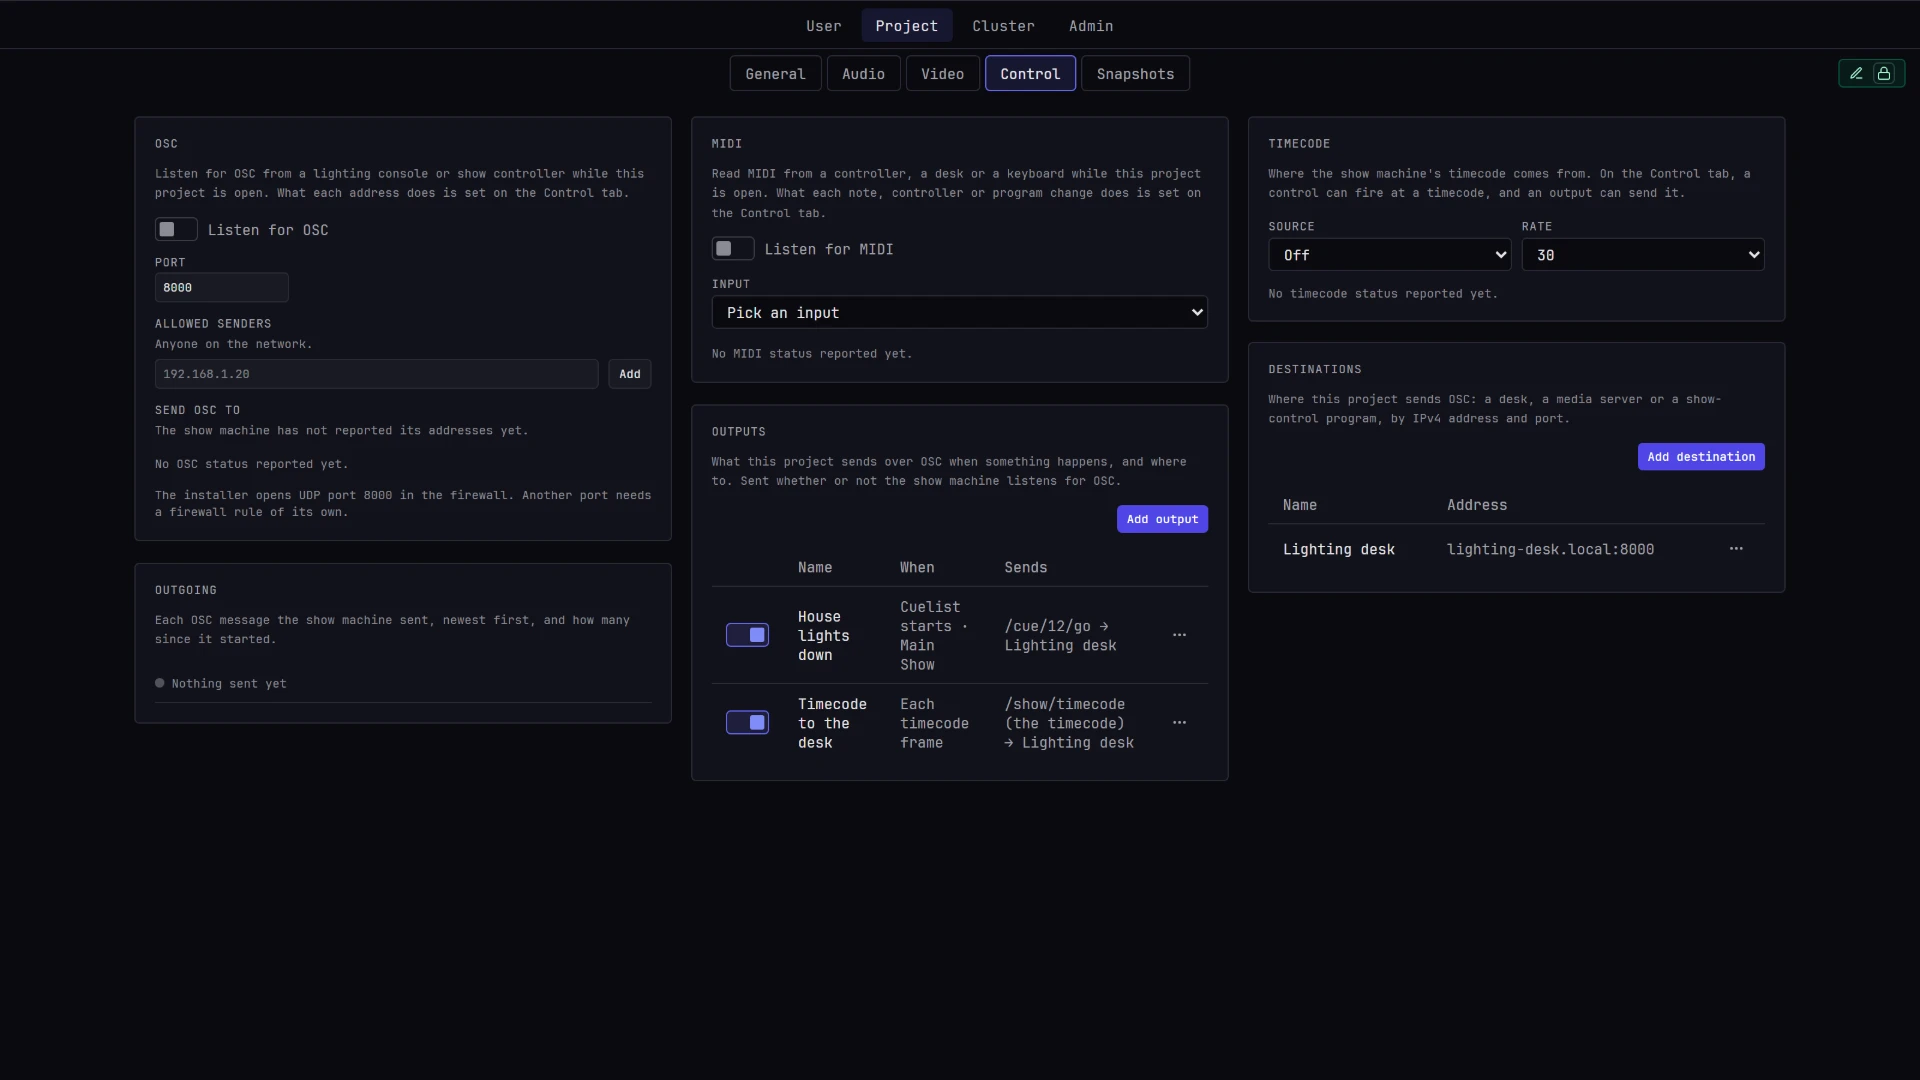
Moonshine can also tell a desk or another system what it's doing. Open Settings → Project → Control: the Destinations, Outputs and Outgoing cards are below the OSC, MIDI, Timecode and DMX cards.
- Under Destinations, click Add destination and enter its IP address and Port. Use an address, not a hostname:
192.168.1.50. - Under Outputs, click Add output, then set the OSC address to send, the destination it goes To, and When:
| When | Sends |
|---|---|
| Playback event | When a cuelist starts, pauses, resumes, stops or ends, or a cue starts, for one cuelist or any. It sends the values you give it: a value that reads as a number is sent as a number, and anything else as text |
| Component channel | A channel of the component's Out CHOP named control, from the deck on air, as a single value each time it changes. See What a component needs |
| Timecode | The timecode. See Send the timecode |
Sending doesn't need an open port, so outputs work with Listen for OSC off. The Outgoing card lists each message as it's sent, and shows when one failed. You can't delete a destination that an output still sends to; change or delete the output first.
MIDI
A MIDI controller, desk or keyboard can drive Moonshine too. For example, a note or program change can play, pause or stop a cuelist, and a fader or knob can move a component's parameter.
Choose the input
An administrator sets up the input:
- Open Settings → Project → Control. MIDI is the second card. Like OSC, it belongs to the project.
- Turn on Listen for MIDI.
- Choose the Input from the MIDI inputs the show machine lists. Plug the controller into the show machine; if it isn't in the list, the show machine doesn't see it.
The line below shows the status: Reading MIDI from the input, or why it didn't open.
A control for a note, a controller or a program change
On the Control tab, in the Inspector, set Listens for to MIDI. Then choose the Message (Note, Control change or Program change), its Channel (1 to 16) and its number (0 to 127), and what it does, as for an OSC address.
| Message | Acts |
|---|---|
| Note | Pressed when the key or pad goes down, released when it comes up. A momentary button stays on in between |
| Control change | With its value, 0 to 127. 0 is a release |
| Program change | When it arrives. A program change is never released, so a momentary Blackout or parameter button on one would stay on, and the Inspector warns you in amber. Make the button a Toggle, or use a note or controller instead |
A controller's value spans a parameter's slider. 0 is the bottom of the slider and 127 the top, unless you give the control a range of its own. The fader on screen follows it.
A controller set to a playback action acts on every value above 0 that it sends, so use a button rather than a fader. A button that sends 127 when pressed and 0 when released acts once.
Learn works for MIDI too. Move a fader or press a pad: the Incoming column shows MIDI CC 7 = 64 · ch 1, and Learn on its line makes a control that listens for it (a fader, for a control change).
Jogs
Some desks send a wheel or encoder as two controllers at once: a coarse one and a fine one, usually 32 apart, such as CC 40 and CC 72 on an Intech Grid. This is MIDI's 14-bit control change. Each controller on its own has 128 steps; together they have 16,384, so a value can be set 128 times more finely. A jog is one control for the pair, drawn as a wheel.
- Learn makes one. Turn the wheel on Learn. Both controllers arrive together, and Learn makes one jog listening for both, MIDI CC 40+72 · ch 1, instead of two faders. Then click what it should do, as for any control. If the wheel already has two faders, Learn selects both instead, and the Inspector offers Merge into a jog.
- Or merge two controls you have. On Edit, select the two controls (click one, then Ctrl-click the other, or Cmd-click on a Mac) and press Merge into a jog in the Inspector. The lower number becomes the coarse controller. The jog takes the coarse control's place and action, or the other control's action if the coarse one does nothing. Split into faders turns a jog back into two faders. The coarse fader keeps the action, unless the action is a scrub, which only a jog can do.
- What it does. Like a fader, a jog drives a source parameter that takes a number, or a value of a projector, a surface or a live input, across its whole range or its Span, in 16,384 steps. Give it an input range to spread that part of the pair's 0 to 16383 across the range instead. A jog can also scrub a cuelist: see Scrub with a jog.
- On screen, a jog is a wheel that shows its value to three decimal places. Drag up and down to turn it, more finely than a knob, or press the arrow keys: a thousandth per press, or a hundredth with Shift.
- In the Inspector, a jog lists its Coarse controller and Fine controller. Change the fine one if your desk pairs its controllers differently. Set Sends to match how your desk sends the wheel: Absolute, 14-bit (an Intech Grid's jog wheels by default) or one of the Relative options.
Moonshine reads the pair as MIDI 1.0 defines it, coarse controller first: a coarse value on its own resets the fine one, and a fine value on its own moves within the coarse step. In the Incoming column, a turn of the wheel shows as one line.
Absolute or relative. An absolute wheel sends where it stands, and has ends: past its top or bottom it keeps sending the same value, so what it drives stays put however far you turn. A relative wheel sends how far it turned, so it has no ends: it moves a value from wherever it is and scrubs without stopping. You can set an Intech Grid to either in Intech's Grid Editor.
Scrub with a jog
Set a jog's Does to Cuelist command and it scrubs that cuelist. Turn the wheel and the show's playhead moves with it, one frame per fine step, so a slow turn steps frame by frame and a fast spin covers seconds. It starts from wherever the show is when you begin, so the picture never jumps, and it stays within the cuelist. When you stop turning, the show carries on from there, playing or paused as it was.
To make one, turn the wheel on Learn, then choose Cuelist command under Does in the Inspector. On Play, turning the jog on screen scrubs by how far you turn it.
Unlike a click on the timeline's ruler, a jog never takes another cuelist off air. While another cuelist is on air, turning the jog does nothing, so touching the wheel by mistake can't change the show. If no cuelist is on air, the jog puts its own cuelist on air from the top, paused, and scrubs from there.
An absolute wheel stops scrubbing at its ends, because it stops sending new values; turn it back to scrub the other way. To scrub without limit, set the desk to send relative steps and choose the matching Relative option under Sends. In a show across several servers, a scrub on the leader moves every server, as a scrub on the timeline does.
Timecode
Moonshine can follow timecode, fire a control at a given time, and send timecode on to other systems.
An administrator chooses the timecode source:
- Open Settings → Project → Control. Timecode is the third card. Like OSC, it belongs to the project.
-
Choose a Source:
Source Timecode from Time of day The show machine's clock LTC (audio input) Linear timecode on one channel of an audio input. Choose the input and the channel OSC Messages to one OSC address, as HH:MM:SS:FFtext or as four numbers: hours, minutes, seconds and frames. OSC must be on -
Choose the Rate: 24, 25, 29.97 drop-frame or 30. It must match the rate the source sends.
The card shows the timecode as the show machine reads it, and whether it's locked, meaning frames are arriving. After half a second without frames, it's no longer locked. While there's a source, the status bar shows the timecode too, as TC 20:09:58:12, with a green dot while it's locked.
Fire at a timecode
On the Control tab, set a control's Listens for to Timecode, enter a time such as 20:10:00:00, and give it an action, as you would for an OSC address. The control fires once, when the timecode passes that time going forward. A jump of more than a second, a rewind, or timecode that isn't locked fires nothing. Each control that fires appears in the Incoming column.
Send the timecode
In Settings → Project → Control → Outputs, add an output and set its When to Timecode. It sends the timecode to its destination as HH:MM:SS:FF text on every new frame.
DMX
Moonshine can send the colors in the picture to a lighting desk as DMX fixtures, over Art-Net or sACN, so a wash of lights follows what's on the screens. It samples the show as it plays, picks a set of colors from it, and sends each color as an RGB fixture. Patch them on the desk like any other fixtures.
Turn DMX on
An administrator turns DMX on. Like OSC, it belongs to the project: each project has its own sender, and opening another project switches to that project's settings, or turns DMX off.
- Open Settings → Project → Control. DMX is the fourth card.
- Turn on Send DMX.
- Choose the Protocol, Art-Net or sACN, and enter where to Send to: the IPv4 address of the desk or node, or
255.255.255.255to broadcast to every node on the network. - Set the Universe and the First channel the fixtures start at.
Choose the colors
| Field | Does |
|---|---|
| Colors | Dominant colors: the colors that cover most of the picture, as many as you set under How many. Each color keeps its fixture from frame to frame, so two colors never swap channels on the desk. Zones: the picture divided into a grid of Columns × Rows, one fixture per cell, left to right then top to bottom, for a wash that follows the picture across the screen |
| Order | For dominant colors: By area, largest first, or By hue, around the color wheel |
| Fixture | RGB (3 channels), RGBW (4 channels; white is the part the three colors share) or Dimmer + RGB (4 channels; the dimmer at the color's brightness, the color at full) |
| Attack, Release | How quickly a fixture follows the picture getting brighter and darker, in milliseconds. 0 is immediate. A longer release stops a cut to black from strobing |
| Brightness, Gamma | The output curve, applied last |
| Sends a second | How often the colors are sent, from 1 to 44. The default is 30 |
Under the fields, the card describes the patch in words, such as 8 RGB fixtures, universe 0, channels 1–24. Patch the desk to match. A fixture never spans two universes: if it would, it starts at channel 1 of the next universe.
What the desk receives
Once the show machine is sending, the card shows a swatch for each fixture in the color it's sending, and a status line: Sending DMX on universe 0, or the reason it isn't. If a desk or node receives nothing, it's usually on another network or listening on another universe.
Art-Net uses UDP port 6454 and sACN uses 5568. Sending doesn't need an open port on the show machine. In a show across several servers, only the leader sends DMX.
OSC and the screen work while someone has the Cue tab open
Someone editing playback holds its lock, but a message from your desk or a press on the Control tab doesn't wait for it: the cuelist plays anyway. The license still applies.
On a show of several servers, drive the leader
A server that follows another plays its leader's cues and refuses cuelist commands from anywhere else, so point your desk at the leader. See A show on several servers.